Sunday, March 22, 2015

8 Things To Do When Sickness Strikes


We were supposed to go on a family daytrip... plans were made... destination was set.... bread was made, ready to be sliced for sandwiches....cans of tuna were on the table waiting to be made into tuna salad sandwiches just before we left.... first aid kit was all packed... bottles of water were ready.... snacks were ready and in the cooler.... cookies were made.... cameras had charged up batteries.... we were all ready to go. It was going to be a great trip. Then, at bedtime, I heard those dreaded words, "Mom, I don't feel well."

We hoped it would be gone by morning... it wasn't and instead of a special day trip of hiking and touring this old mansion, a few of us were sick and only able to shuffle from bed to sofa to chair and back. A couple of us spent almost the whole day lying around and sleeping. There was no energy at all... no appetite... no interest in reading or anything....  we were sick.  There has been sickness going around and we have done well and haven't gotten it... but now we have.

What is a mom to do when someone is sick? Especially when Mom is also one of the sick ones? Hmmm.  


Well, here are some of the things that this mom does:

We try to eat healthy most of the time and are in quite good health, for the most part. The week prior to this, though, had been rushed, hectic and our meals hadn't been as healthy. Also we had a birthday to celebrate... and company several of the nights... and very late bedtimes... and stress. 


1. Evaluate
Normally, when someone is sick, I immediately activate and try to pinpoint the possible cause...and treatment. Evaluating the days before the sickness is one of those steps, since that helped me see very quickly WHY we were sick... too little sleep, not good nutrition, too much stress, etc and our bodies were unable to fight off what was "going around". 

Another thing I usually do is to evaluate symptoms. In this case, the biggest symptom was extreme fatigue, weakness and lethargy, along with headaches, nausea and more. No fevers. Not every person had the exact same symptoms, but there were some symptoms that hit all who were sick... mainly the fatigue, weakness, headache and nausea. 


 2. Research

 Research can happen in trusted books.... this is one I really like...and I also have many others. Research can also be done online(but be VERY careful of advice given there... I like to have 2 sources or more giving the advice.)  It is good to keep notes of information found so that it is available when needed. Research can also be done by talking with someone you trust... a friend or parent or other person who it knowledgeable on the subject.


3. Get a lot of rest and drink lots of fluids
Anyway, this time I was also sick.... and I knew my problem was stress, exhaustion, adrenal, etc. with the most urgent need being sleep, so I slept all I could for two days. All of us needed rest and sleep. 

 Sleep was good and needed... and lying around was fine. Lots of water was needed to flush toxins from the body, but who wants to drink a lot of water when not feeling well? Still, it has to be done.

Many times, over the years, I have noticed that different family members will respond differently to the same treatment when they have the exact same symptoms. Puzzling, but as I have analyzed that, I have found success when I treat each similarly, but tailored to each person. For example, I have noticed that one person may seem to do well when I try to treat their liver, another the pancreas, or lungs or digestion. It's not an exact thing, but it has sure helped. So, when one child has an upset stomach, I immediately suspect some constipation... and deal with it through essenial oils, pressure points, vitamins, etc. The same is true for other issues. It just shortens the process of dealing with issues, since some of them appear more often with sickness.


4.Use Herbal Teas Herbal teas are wonderful... they can be used to address specific symptoms... or just for general health.


 5. Take Probiotics


 The probiotics in this picture are in the form of a Kefir smoothie. It could also be in the form of kombucha, yogurt, tablets, etc.


We also did  detox baths, probiotics, vitamins, lots of fluids, oils on the feet and ears, and herb tea and other things.


6.Use Essential Oils

Essential oils are helpful ....  in so many ways... we use them on the bottom of the feet and on ears, in bath water, diffused in some way, as a cleaner for germs...and more.


7. Take Herbal Tinctures and Vitamins
 Herbal tinctures can be very helpful... I make my own... it is a way to preserve and condense the nutrients of the herbs.  There can be a lot of nutrient value to tintures.... Also vitamins can help, depending on what the sickness is.  The point is to help support the body while it is sick so that it can recover.


8. Take a Detox Bath There are different kinds of detox baths.... we use epsom salts and essential oils... or ginger, red pepper and baking soda... or I experimented today and came up with a really good one, but I need to work on the ingredients and amounts. I will probably share more on that another time. Even just an epsom salts bath can be so relaxing and helpful.

These are not "magic"... and maybe you would do only a couple or a few of these things... or maybe all of them... or maybe more. I am not a doctor or a health professional, just a mom with a lot of children... who studies and experiments and I have found some great things that help us, so I am sharing those.

A few other things are reflexology points... massaging them on the feet or hands... or back, etc., can help relax and allow the body to work better.  Sometimes a coffee enema can be helpful... I have seen it do wonders with a high fever since it can remove the source of the fever if the infection is in the intestines.

Today, we are improving, but not over it all yet. However, since I am able to write this, it is obvious that I have improved much since yesterday, I couldn't do anything but the bare minimum. We will need to be careful this week to allow our bodies to heal all the way... to rebuild our strength and immune systems. After the way I felt yesterday, I would have expected to be wiped out and incapacitated for days... what a relief to have a little energy again, even if it isn't the full amount I should have.


One tidbit I learned from a nutrition doctor years ago was:  You can eat everything healthy, you can drink enough water, you can take vitamins and nutrition, you can do everything "right", but stress can short-circuit everything.... and I have seen this to be true again and again. Too much stress is not a good thing, but we tend to live with too much stress...   

Anyway, these 8 things can help to get over some sickness and get well. Maintainence is wonderful, but this article is about dealing with a bout of sickness and getting over it. I hope you and your family enjoy good health... and when you do face a problem with illness, maybe these things will be helpful to you. One thing we do each time is to pray also... to God who is the One who knows all things and is the Great Healer.  Thank you for visiting.  :)


Shared on:


Scraptastic Saturday
Simple Saturday
Blogger's Pit Stop
Reader Tip Tuesday
Friday at the Fire Station
Paula's No Rules Weekend Party
Home and Garden Thursday
Homestead Blog Hop
Totally Terrific Tuesday
Tuesday Cuppa Tea
Tuesdays at our Home
Cooking and Crafting w/ j and j
Art of Homemaking Monday

Featured on:

Scraptastic Saturday 

Thursday, March 19, 2015

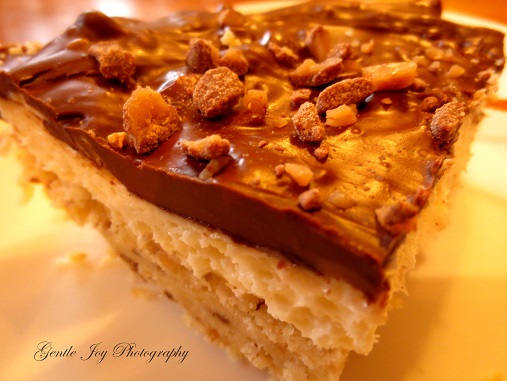
Creamy Chocolate Coconut Toffee Dessert


 I have been working on a new dessert.... and this is what I came up with......

The first layer has flour, butter, coconut, chocolate toffee bits  all mixed together. Here it has been dumped into a greased pan.

It gets patted down lightly...


and baked.  This is the crust. 


It was baked for 30 minutes.  Actually, this looked and smelled good enough to eat like this... just as a shortbread type of cookie bar. Yum...  but it gets better....

 Next comes cream cheese and powdered sugar all creamed together and then vanilla and frozen whipped topping added.  It is light and fluffy... and it gets spead over the crust. 

More of the chocolate toffee bits are sprinkled over the filling... use as many as you want. I also added some sliced pecans on this layer, but those could be easily left off, if desired. 

It already looks great.


Next step is to melt some chocolate and pour it over the dessert... then smooth it out a bit.

More of the chocolate and toffee bits are scattered on top of the melted chocolate.  Mmmmm.

 The chocolate was still melted and we just HAD to try it... and it was SO rich and yummy, but I thought it would be even better when cooled, so we chilled it overnight.


This was definitely better!!!  It wasn't necessarily chilled, but it was all set up.....


and it was wonderful. 


 The top layer has chocolate that has set up and is almost fudgy-like.. the middle layer is creamy and the crust is lightly coconut flavored.


The flavors just go together and are wonderful. It is sweet, but the middle and bottom layers were left with less sugar, on purpose, so the whole dessert is not sickening sweet... just very satisfyingly sweet.


It can seem overly sweet if eaten when freshly made when the chocolate is still melted. I think it is much better when allowed to set.


                        ~~~~~~~~~~~~~~~~~~~~~~~~~~~~~~~~~~~~~~~~~~~~~~~~~~~

            Creamy Chocolate Coconut Toffee Dessert

             Crust:    2 1/2 cups flour
                           1 cup butter
                           1 cup sweetened coconut
                           2/3 cup milk chocolate toffee bits (I used Heath brand)
                                  Mix all together. Spread and press into greased 9" x 13" pan.
                                                 Bake at 350 degree for 30 minutes  Remove from oven, cool

             Filling:   2-8oz cream cheese, softened
                            1 1/2 cups powdered sugar.................cream both together well
                            1 Tbsp vanilla........................................ add and cream till light and fluffy
                            4 oz frozen Whipped Topping ............mix in....... and spread over crust

                             1/2 cup milk chocolate toffee bits............... sprinkle over filling
                              pecans - chopped or sliced..........................sprinkle over filling (optional)

             Topping:  12 oz chocolate ....................................melt and spread over filling
                              1/2 cup milk chocolate toffee bits........... sprinkle on melted chocolate
                                                 Chill or allow to set up.  Enjoy.  :)

              ~~~~~~~~~~~~~~~~~~~~~~~~~~~~~~~~~~~~~~~~~~~~~~~~~~~~~~~~~~~~~~


Shared on:

Saturday Soiree
Funtastic Friday
Front Porch Friday
Paula's No Rules Weekend Party
Home Sweet Home
Hearts For Home
On Display Thursday
Thriving On Thursday
Share Your Style
So Much At Home
Work In Progress
Homemaking Link Up
Wednesday Wisdom
Wake Up Wednesday
Try A New Recipe Tuesday
Homemaking Linky
Tell It To Me Tuesdays
Tasty Tuesday
Talented Tuesdays
Roses of Inspiration
Tuesday Talk
What'd You Do This Weekend?
Modest Monday
Art of Homemaking
City of Links
Weekend Potluck
Funtastic Friday
Freedom Fridays


Sunday, March 15, 2015

Small Garden-Companion Planting Part 4

In this small garden series, we are looking at some of the ways to have a successful garden... even when it is just a small one. We have addressed crop rotation, vertical planting and where to put more beds and today's topic is companion planting. Does it really matter where things get planted? Yes, it can be a big help.


I came across this book years ago, at the library, and I checked it out and read it. There was a lot of great information in it and I incorporated it into my garden planning... and it really helped. This is just one of the books I have found helpful.

A few years ago, I found this copy at a garage sale, so now I have my own book. There are many other books on companion planting now, but this was the first one I was exposed to and I have appreciated it.

 By the way, I have MANY other gardening books in my library and I love having sources to go to when I need them.


It tells facts about different garden crops - including what plants grow well together and which ones don't.  It gives gardening hints and tips... and is quite practical.
 At the time, I had to turn the book in to the library and couldn't keep it as a resource, so I made my own list that was more user-friendly for my purposes.....no, it wasn't neat, but it works. :) 

I also copied things that I thought would be helpful to me at the time. There is much more information in this book than I will share here... and other books also have a wealth of information. I take notes from many of them and keep learning.


As I have said before, I have a small area to garden (only a 1/4 acre city lot) and so I put my plants quite close together.... the arrangement in this picture wasn't my first choice, but it did work well that year for a second crop of cucumbers and a third crop of tomatoes.

In my garden beds, I usually have 2 of my 4'x 8' beds that have tomato plants going down each side. (10 total in each bed). In the middle of the bed, between the rows of tomatoes, I plant carrots and have also planted onions in rows in there as well...  it seems tight, but it works.

I have had dill and basil in my herb gardens, but I plan to plant basil in the regular gardens as well. I have been planting dill  "all over". :)  I love dill - such a wonderful herb.
Dill- Not Only For Pickles!
It can help other plants and still be harvested.
 Here are more of my notes on crop rotation... no, I don't follow all of them all of the time... but I appreciate having a guideline that has worked.

Apple Tree: Plant chives around to prevent scab
Fruit Trees: like garlic, chives, onions, nastursiums.... when fruit ripens, hang sliced onions in tree
Broccoli: likes dill, celery, peppermint, beets, onions, geranium, nastursium... does NOT like tomatoes, pole beans or strawberries.
 Carrots: like tomatoes, leaf lettuce, chives, onions, leeks, radishes; does NOT like dill.
Corn: likes geraniums and cukes, potatoes, peas, beans, pumpkin, squash, melon... does NOT like tomatoes
Cucumber: likes nastursium, beans, chives, peas, radishes, dill, sunflowers, and young orchards, but does NOT like beets.
Tomatoes: chives repel aphids; likes garlic, marigolds, mint and basil helps w/ insects and diseases and helps growth and flavor.


 A few more items...

Peas: like carrots, do NOT like garlic or onions
Onions: like dill, summer savory
Lettuce: likes dill, onions, strawberries, cukes, carrots, radishes
Peppers like basil
Strawberries like spinach

Dusty miller around plants can help repel rabbits

Melon, squash, cukes - Do NOT rotate with each other.
Squash likes nastursiums, icicle radishes

Oak leaves repel slugs
Roses - bury banana peels (potassium) 3 at a time. like garlic planted with them or as a spray,


There are many hints and tips.... it is helpful to gather them from books, gardeners, internet or more...  and put them into your own notebook, so that you have access to them.  These are only some of the things I gleaned early on in my gardening.... since then I have learned even more by trial and error, research... and necessity. With a small garden, some of the regular "rules" don't work as well, but with some creativity, the garden can still thrive.

When you have plant likes and dislikes to consider, it can become a bit like a puzzle to put it together.... it is not something to stress out over, and yet, it can be helpful.

I also plant marigolds around my garden beds and nastursium on the border... both can help to repel harmful insects.... AND nastursiums can be eaten in a salad. :)    Onions can be planted around a garden bed to repel rabbits... at least somewhat...  I need to try this and dusty miller more this year... last year, the rabbits ate my pepper, beet, and bean plants right down to the ground several times and I realized I should have followed this tip.   

I haven't found a successful help for squirrels, especially as we live in the city and are not allowed to "ping" them w/ a BB.  If you know of any squirrel helps, I would love to hear about it in the comments... those squirrels LOVE my tomatoes.  :)

There is so much to learn and I look forward to another year of learning and enjoying the fruits(and vegetables!) of our labors. :)  The information in this post is by no means, exhaustive, but maybe you will find some helpful tidbits here. I hope so... thank you for visiting.


 Small Garden Series

Small Garden-Crop Rotation Part 1

Small Garden-Growing UP Part 2

Small Garden-More Beds Part 3

Small Garden-Companion Planting Part 4


Shared on:


Simple Saturdays
Foodie Friday and Everything Else
Home Sweet Home
Homestead Blog Hop
Wise Woman
Tuesday Talk
Modest Mom Mondays
Art of Homemaking

Thursday, March 12, 2015

Pulled Chicken on Homemade Buns


This meal was really enjoyed by my family... it was pulled chicken... cooked all day in the crockpot......... and served on homemade buns. What a great entree!   :)


First, I made a batch of bread dough and as I usually do, I used this recipe:

Basic Homemade Bread Recipe

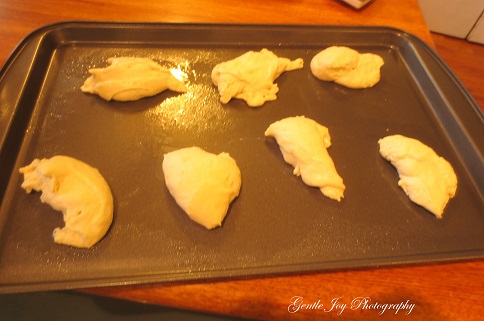
After the bread is mixed and raised in the bowl, I spooned out some globs of dough onto the greased cookie sheets.

Working with each glob... I flattened and stretched them out forming round circles of dough.


We were hurrying and these are not perfectly round, but they tasted great! 


I sprinkled sesame seeds on the tops and pressed them gently into the dough. 


Next, they need to rise for the second time... and they do this on the cookie sheet. 

Here they are about ready to put into the oven. 
  Here is the pulled chicken....  I cooked many pounds of chicken breast the day before and I did it similar to this:

Strange Marinades For Chicken

The marinades I used, though, were from rinsing out the bottles of ranch dressing, asian dressing, ketchup, mustard and BBQ sauce. :)  It was nice to get the condiments cleaned out.  There was a lot of broth on the chicken and I pulled it apart and allowed it to soak up all of that wonderful juice. The next day (the day we had Pulled Chicken on homemade buns), I poured lots of BBQ sauce on it and let it simmer all day long. It smelled WONDERFUL!  :)
 Here are the buns in the oven...  baked at 375 degrees for about
20-25 minutes.

  Just check to be sure they are done, but not burned.

 When the buns come out of the oven, cover them with a dishtowel right away to keep them nice and soft.

After a few minutes, slice each bun in half.  You can see that my buns are rather thin... this is on purpose, but if you like thicker buns... just use more dough and don't press it as flat. 

 After they are all sliced, they can be covered back up until you are ready to put the meat on them.


Here, the buns are open and ready to load up with meat. 

Here's the pulled chicken on the bottom part of the bun... looks good. :) 


Below is a plate of sandwiches all ready to eat.  We had a salad and chips with the meal. Yum. This was enjoyed by all... and we will be making this again!  :)


Shared on:


Snickerdoodle Create Bake Make
Scraptastic Saturday
Simple Saturdays
Weekend Potluck
Foodie Friday and Everything Else
Thursday Favorite Things
Homestead Blog Hop
Wednesday AIM Link Party
Talk of the Town
Tuesday Talk
Tuesdays with a Twist
Make It Pretty Monday
Project Inspire(d)
Art of Homemaking Monday
Cooking and Crafting w/ j and j
Modest Mom