Friday, April 8, 2016

Family Room Project: Adding Built-In Bookshelves


The space between the stairs and a bathroom in the family room seemed to be a great spot for more shelves.

I have found built-ins to be sometimes  too limiting for me, but this seemed to be a perfect place for floor to ceiling and wall to wall bookshelves.

  Our family room is used as our library and we have had many bookshelves that hold thousands of books.

 The family room is long and rather narrow and the extra bookshelves made the room look smaller, so this seemed a good way to add more storage space and then free up floor space at the same time.


This wall has been rather useless to us even though it looked nice... it had 2 wall lights (the places where the cut-outs are) that were in an awkward spot. We have had a large mirror on this wall or a picture, even a small desk.. and we also tried having bookshelves here, but the lights tended to glare in our eyes, making it hard to see the books. This spot just always ended up being not too useful to us.

Our oldest son agreed to build the shelves for us. What a blessing!

Here he was removing the paneling to access the wiring to change the lighting... I hadn't taken a before picture, so he's holding it for the picture. :)


The wall is open... he had closed off the wiring from the other light fixtures and will put 2 recessed lights in the ceiling above and in front of the area the bookcase will go. 

 There wasn't any secret treasure inside the wall.... we looked.  :)


The wire hanging down had to be taken down to remove the wall... it is wiring for cameras that another son installed outside.

After this picture, they just hooked it up a bit to get it to stay out of the way until the family room project is done.


Son #1 put the new lights in... you can see one of them in this picture. It sure added a LOT more light to the area.

He started the bookshelf with putting the frame up.


He added shelving and we talked of how to make sure it would be sturdy. He is very good at working with wood and it was a delight to see the work he did. We rarely get to see the work he does since he does it on his job.

 It was  treat to have him here at our house more often and to see the wonderful work.

He put supports in the middle of each shelf and then added a slim board along the front of each shelf as a finishing touch. He also arched the top of each side so that it would match the built in shelves that are beside the fireplace in the same room.


The bookshelves are 6 feet wide x 8 feet tall and are wall to wall and floor to ceiling. This picture shows them before they are totally finished... there will be more to come.

This will be my resource library... for books on health and nutrition, herbs, cookbooks, and much more.

These shelves allowed me to get rid of several freestanding bookcases in the room and should help to give the room more space. What a blessing.

The family room project will continue in future posts as we make more changes in paint, ceiling and fireplace. I hope you will return to see what these shelves look like all painted with the new paint colors.

Thank you for visiting.


Shared on:


Inspire Me Tuesday


Wednesday, February 3, 2016

Old Fashioned Toys-Pattern Blocks


If you haven't heard of, or used, pattern blocks, I want to show you what they are and how they are used.

Pattern blocks come in a set with 6 shapes and each shape is a different color. Some sets have variations in the color which is what we have since we have many sets now, and they are all used together.


The shapes can be fitted together to form patterns. These patterns can be simple as little ones make trucks, people or other things with them, using lots of imagination, of course.


More complex designs can also be made... many times just by accident as a child (or adult!) just starts moving the pieces and experimenting. 


There are hundreds of possibilities... probably even more.

It is also possible to buy cards that have colored patterns on the cards and then the child can put the pattern blocks on the cards to reproduce the pattern.


You can also buy books with patterns that are only black and white and then child puts the correct pattern block on the page(without having the color to help them) and reproduces the pattern.


These can be done at a slower pace or as they get faster, they can be timed, to make it more fun.
                   ~~~~


In these patterns, you can see the optical illusions that are possible... the cubes that seem to stand out.


My kids enjoyed the structured play with these blocks... using the patterns on paper, but they REALLY enjoyed the free creativity with them while they made their own patterns. 


This pattern is a continuation of the pattern above-not the one right above, but the one before... she added to the existing design above and created one that looked even different.

We have taken these pattern blocks outside for playing with the neighbor kids. The neighbor kids go to public school and always seem to wonder about our homeschool. The funny thing is that they love the simple toys like this even though they have many electronic and modern toys to use. 


We have also brought these out when we have had company and it is surprising how many people have never seen these, but enjoy using them.


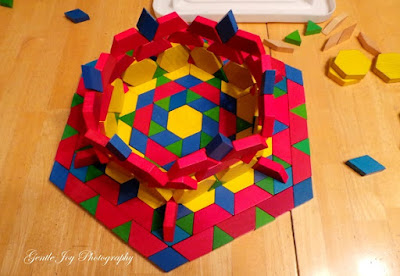
Sometimes, my kids like to try some building designs.   :)

This looks like a mosaic. There are many ways to use these blocks for learning. Kids can learn about symmetry in design. They can learn to appreciate the art of their siblings. 

I have used these pattern blocks years ago, to design a simple quilt pattern. It was nice to see and play with the possibilities before I started cutting out fabric and sewing it together. No, this isn't the design I used. :)

We bought our first set of pattern blocks about 20 years ago for about $20.00. At the time, we chose to buy the foam blocks because they were quieter and we had a child with special medical issues and needed the quiet. Those were nice (although some of them ended up with teething marks from the toddlers! :)  


 We have also had plastic blocks and wooden ones. The wood ones are, by far, our favorites, so we sold the others and have added to our original set of 100 blocks or so. I have found them at garage sales and I buy them when I can. We now have a large set and can make lots of designs, even when we have several people using them at the same time.   :) 


We first bought these as they were required for our math curriculum manipulatives... the set offered for the curriculum only had a small amount of these blocks, so we decided to buy a larger set. It was hard to pay that much as money was very tight, but we have not been sorry. It was one of those great purchases. Some of you have parents and grandparents who want ideas of what to buy for your children... this is a great one... especially as a family "toy". Smaller sets would be fun, but a larger set that you can add to is even better.

 These red "arms" almost look braided. There are so many possibilities for using these blocks. I hope I have shown you enough to spark your interest in them.

By the way, I am a mom who doesn't really like battery operated toys or electronic toys much at all. I love the kinds of toys that stimulate my children to think, to experiment, to learn... as they play and have fun. That is why I am so in favor of these blocks.

Yes, as my kids get older, they do use computers and cell phones and other electronics, but I am glad we focused on the simple old fashioned toys the most.


We made all of these designs in the last few weeks as we listened to some Science lectures. What a blessing to have our hands busy and to also learn about Creation and the flood and more. It had been quite a long time since we had these out and we all enjoyed our time.

 Thank you for visiting. If you have used pattern blocks, I would love to hear about it. If you haven't, I would love to hear from you also. I hope you have a great week.  :)


Friday, January 1, 2016

Top 10 Gentle Joy Homemaker 2015


The top 10 posts published in 2015 on the Gentle Joy Homemaker blog are listed here.

Feel free to click on the title of each (it is actually a link) and the post will come up for you.


           Number 10

 Garage Sale Series-Hints and Tips


                Number 9

   Small Garden-Part 3-More Beds


                Number 8

   Pulled Chicken on Homemade Buns


        Number 7 

Small Garden-Part 4-Companion Planting 


      Number 6

Small Garden-Part 2-Growing UP 


                  Number 5 

 Small Garden-Part 1-Crop Rotation 


         Number 4

 Yes, I'm Sleep Deprived, So What??? Part 2 


                 Number 3

                Dress Up A Plain Cabinet 


          Number 2

8 Things To Do When Sickness Strikes 


Number 1 for 2015

Trip To The Amish Store 


It's been a challenging year, but it has also been a good year. Thank you for joining me in it. I hope you have a wonderful 2016.  


Shared on:
Tumbleweed Contessa