Sunday, June 25, 2017

Picket Fence Hides the Trash Cans...


 We live in the city, although we would love to move to the country. While we live in the city, we want our yard to look nice, and also be very usable.

We have areas that are utilitarian... not pretty. One of those areas is between our two large pine trees where we store our trash and recycling cans.


 I'd much rather look at an old picket fence than at the trash cans, so when we found an old one for free, this was a perfect place for it.

At first, my guys didn't think it was necessary, but we have all been glad to have those trash cans shielded a bit. I sure appreciated the work the guys did to make this old fence work here as they had to adjust the size of it and anchor it into the ground.


 From the deck, we can look out to the back garden with the gray picket fence and also see the picket fence in front of the trash cans.

I added hostas in front of the fence to give color and interest to the area. The pine trees drop pine needles which forms a pretty brown carpet and makes a natural mulch for the hostas.


 Here, you can see the fence between the two trees and the hostas in front of it. Other stuff that we need to deal with is behind that fence and you can see it a little. I am so glad it is behind the fence where it isn't obvious. 


We also found that this is a good place to put a thermometer since it is in the shade much of the day.

Are the trash cans totally hidden? No, they can still be seen, but the picket fence in front allows your eye to flow over them rather than to be drawn to them.


This next picture shows some of our garden areas... and at the far right you can see the trash cans with the picket fence in front of them.

At the back is the new little courtyard patio that I blogged about here:
Table Top Becomes Courtyard Patio!

The wonderful raised garden beds are in this post:
New Raised Garden Beds

The picket fence around the back garden was also an old fence we reused when someone else was done with it. There are lots of ways to use an old picket fence in the garden or yard. I love having it around my garden and shielding the trash cans, but it can also be used as an accent for a flower bed or to add interest to a boring corner of the yard.

If you have a chance to get some picket fence, it doesn't have to be in perfect shape to work well and look nice....  these have been in use in our yard for several years and they were old when we got them. They still have many years of use left in them. Sometimes a picket needs to be replaced, and we do it, but for the most part, they are fine out there with not much care at all once it is in place and I like that. I don't want to have a lot of yard items that need lots of care.

Do you have a section you want to "hide"? A picket fence could work, but something else could also... this is a time to think "outside the box" and be creative. A trellis with vines growing on it would also work....at least in the summer and fall months. What solution have you used in your yard to hide something? Feel free to share your ideas in the comments.

Thank you for visiting... 


Shared on:
Tuesdays at our Home
Snickerdoodle Create Bake Make
Scraptastic Saturday
Simple Saturdays
Saturday Sparks
 Friday at the Fire Station
Foodie Friday and Everything Else
Thursday Favorite Things
Paula's No Rules Weekend Party
Vintage Charm
Wise Woman
Homestead Blog Party
Share Your Cup
Homemaking Party
Wednesday AIM Link Party
Penny Pinching Party
Gardens Galore Party
Talk of the Town
Tuesday Talk
Tuesdays w/ a Twist
Make It Pretty Monday
Project Inspire(d)
Inspire Me Tuesday
Inspire Me Monday
Art of Homemaking Monday
Cooking and Crafting w/ j and j
Modest Mom
Over the Moon Party


Sunday, June 18, 2017

Decorating the Ceiling....


 This post is about decorating the ceiling...  and it is surprising how much some ceiling decoration can add to a room!

A few years ago, we removed the popcorn ceilings in the house... WHAT a HUGE job that was! It was so worth it though, and lightened the rooms nicely.

After removing the popcorn ceilings, we painted the ceilings a white paint that reflected the light back to the room. The rooms were so much nicer after that.

Having painted ceilings meant that we could also decorate the ceilings. :)  I don't mean decorating them in a busy way, but some accents can add to the room.

This post shows some of that:

What a Difference! Master Bedroom


 This picture shows a medallion I painted on the dining room ceiling several years ago. At that time, the walls were a ragged gray and green and we loved them. ( You can see a picture of the wall from that painting job, here:
 Big Painting Project


I did not want to paint it again when we painted the room, so I left this medallion the way it was... and added to it.


 The blue walls made me want to add some blue to the ceiling, so I left the original white medallion on the gray ceiling, and added blue touches to make the medallion larger.


 The white part shows up better in the light since it is a glossier paint than the blue, and I actually like it that way, though I wouldn't have planned it like that.

The blue paint I used is the same paint as on the wall, but you can also use a stencil paint that is close to the color of the wall.


I also added a border around the inset of the tray ceiling and it seemed to tie it all together.


 I used a regular stencil  and repeated the design.  I used that stencil in various ways on the medallion also.

 I kept the design rather simple and only in the two areas as I did not want to overwhelm the room, but rather just accent it.


We all like how the ceiling turned out and have had lots of comments from visitors who also like it. One comment was that it has a French look.  That's fun to hear.  :)

What a blessing to make such a change for very little money...  stenciling is a frugal way to decorate our home.

Another post you may be interested in:

Family Room Project: Ceiling Design


 #StencilingTheCeiling  #CeilingDesign #StenciledMedallion


Shared on:
Inspiration Spotlight
Tuesdays at our Home
Tip Tuesday
Paula's No Rules Weekend Party
Dishing It and Digging It
Snickerdoodle Create Bake Make
Scraptastic
Saturday Sparks
Simple Saturdays
Friday at the Fire Station
Friday Frivolity
Foodie Friday and Everything Else
Vintage Charm Party
Paula's No Rules Weekend Party
Thursday Favorite Things
Share Your Cup Thursday
Homemaking Party
Penny Pinching Party
Wise Woman
Wow Us Wednesday
Tuesdays with a Twist
Make It Pretty Monday
Inspire Me Tuesday
Inspire Me Monday
Cooking and Crafting with J and J
Modest Mom Monday
Art of Homemaking Monday
 Over the Moon Link Party

 Featured on:

Over the Moon Party 

Sunday, June 11, 2017

Brownies with Peanut Butter Center


 Chocolate and peanut butter just seem to go together. These brownies combine them in a wonderful way.

A chewy fudgy brownie with a peanut butter center in the middle of each one.


I mixed up my homemade brownies in one bowl and my peanut butter mixture in another.

I put about half of the brownie batter in a greased pan.... and then spooned the peanut butter mixture all over the brownie batter. 

After putting the peanut butter all over, then cover it with the rest of the brownie batter.


 Smooth it as much as possible... it doesn't need to be perfect.

Time to bake it...


 All baked.


 Put chocolate chips all over the top of the hot brownies. Let them sit for about 5-10 minutes or just until melted.

When melted, use a table knife to spread the melted chocolate over the brownies. This will make a quick and easy "frosting" layer.


Now, they need to cool. This part takes quite a while... especially if you are impatient to taste that chocolatey-peanut butter goodness!

If you try to eat them at this point, you will need to eat them with a spoon... and you will probably burn your tongue.  Yes, there is a reason I know this.   😊


This plate of brownies was made after the brownies had cooled on the counter for an hour or so. I was sending some to work with my husband the next day and needed to get them done before bed. They were still so gooey... and not at all cooled off.

They look pathetic. It is MUCH better to let them cool.... but my husband said his co-workers loved the brownies.  :)


 TIP- One dessert my family LOVES, is hot brownies with ice cream on top. These Brownies with Peanut Butter Center would be delicious that way... and would make a wonderful dessert for company. 

When they cool... and chill... they look more like this:


 What a great snack...  brownies with peanut butter centers and herb tea. It is great out in the garden also.

The flowers in the vase are yarrow, thyme and radish tops that have gone to seed.... they are so pretty.

By the way, when an elderly friend was in my garden and saw radishes that had gone to seed, she asked WHAT those were doing in there.  I told her that they were pretty and so I was letting them stay. I liked the pretty lacy look of them in the garden and since I didn't need that area at the moment, I left them. She gave me a look that told me she had NO idea what I was talking about. She said she always takes them out of the garden before then. I guess it is the artist in me that enjoys that.... it was funny though.... and I am enjoying them in my vase also.


    ~~~~~~~~~~~~~~~~~~~~~~~~~~~~~~~~~~~~~~~~~~~~~~~~~~~~~~~~~~~~~~~~~~~~~~~

                            Brownies with Peanut Butter Center


1st Bowl....
  1 cup melted butter
  3/4 cup baking cocoa
  2 cups sugar........................................... Mix together
  4 eggs
  2 tsp vanilla............................................ Beat in
  1 cup flour
  1/2 tsp salt
  1 cup chocolate chips..............................Mix in...Put half of this mixture into a greased 9" x 13" pan.
  

2nd Bowl
  1 1/4 cup peanut butter
  1/4 cup melted butter
  1 cup powdered sugar..............................Mix together. Spoon this mixture onto brownie layer.

                                                                    Spoon the rest of the brownie batter over the peanut butter.
                                                                    Smooth it out a bit. Bake at 350 degrees for about 30
                                                                     minutes. Bake a little longer if needed.

                                                                    Take baked brownies from oven. Sprinkle 1 cup of
                                                                     chocolate chips over hot brownies. Let sit till melted. This
                                                                     should take about 5 minutes. Then spread the chocolate
                                                                     over the brownies, like frosting.

                                                                     Let cool, then cut. These are a wonderfully rich treat.  😋
                                                                   
~~~~~~~~~~~~~~~~~~~~~~~~~~~~~~~~~~~~~~~~~~~~~~~~~~~~~~~~~~~~~~~~~~~~~~~~~~


 These are not hard to make, but they taste really special.... and have been greatly enjoyed by all who tried them.

I used bittersweet chocolate chips in them this time, but semi sweet or milk chocolate would be delicious also.

This is a recipe that was an experiment, but I will definitely be making it again... my family loved it! :)  If you are short on time, you could use a store-bought brownie mix for Bowl 1.

TIP... When using a store bought brownie mix, instead of using the oil it calls for, use butter. The flavor will be much better! 

 This is a good recipe to hang onto until you need a dessert or snack that is just a bit more special... like to take to a potluck, or serve for dessert.

Thank you for visiting... I hope you have a wonderful week! 


Shared on:

Foodie Friday and Everything Else
Paula's No Rules Weekend Party
Wednesday AIM Link Party
Snickerdoodle Create Bake Make
Scraptastic Saturday
Simple Saturday
Saturday Sparks
Friday at the Fire Station
Weekend Potluck
Friday Frivolity
Thursday Favorite Things
Share Your Cup
Homemaking Party
Wise Woman
Wednesday AIM Link Party
Friends Sharing Tea
Tuesday Talk
Tasty Tuesday
Tuesdays with a Twist
Make It Pretty Monday
Project Inspire(d)
Cooking and Crafting w/ j and j
Modest Mom Monday
Art of Homemaking
Over the Moon Party

Featured on:

Thursday Favorite Things
Snickerdoodle create bake make
Saturday Sparks 

Sunday, June 4, 2017

Improve Curb Appeal: New Wall & Sidewalk


 We had some patio stones in this area with pea gravel around them, for several years and it was better than mud, BUT it really needed to be replaced. This was especially true in the last couple of years when the paving stones starting shifting and tipping because of tree roots. We took many of them out because they were not easy to walk on, but then we had.... mud, when it rained.

This project was a big one and had been put off for a long time, but finally we decided to get on with it and I was glad to get the project started.


 The guys dug and cut out tree roots and dug some more.


Next step was to put a layer of limestone down as a base...  I don't remember how much they did, but I think it was 3"-4" deep.


Next was the rebar. This step is important to keep the sidewalk and driveway level with each other and prevent settling.  The guys drilled holes into the existing sidewalks and the driveway and made a grid of rebar.


 Finally, we were all ready and the Cement Pouring Day had arrived!

We had gone over instructions so that everyone knew what to do. We had to do this fast since the truck would only be here for 1 hour for the price they quoted us. Any time over an hour would be $90 more each hour and we didn't want to pay that!

We had our hand tools all ready.


We had all of the long tools ready too. We didn't know what all we would need, so we tried to have everything we could think of for the job.

We had never done a big cement job like this before... and this was in the FRONT of the house too, so it HAD to be successful! Pressure.

Son #2 had done research on line for this project and we talked several times leading up to this project on what to do.


 We waited and then the truck pulled up and we all sprang into action, ready to rush.

We couldn't get to work though, since the cement truck driver had to check the cement and get it ready for our job. So, we waited some more.

We did a little more tamping of the stones... that's why the tamper is there. 

We had 3  wheelbarrows all ready for this and people assigned to "man" them.  


 Time to dump cement and rush for the next load. Son #4 on the wheelbarrow here and Son #2 working the cement.  Son #3 is at the wheelbarrow being filled and will bring the next load... and I am on the wheelbarrow next in line after him.


Moving along as we added so many wheelbarrow loads of cement. It was hot and we were rushing so fast.

We started to wonder if the 2 yards of cement we had paid for would be enough. We rushed through hoping it would be plenty.


 We were doing another project at the same time... stabilizing a brick retaining wall.  My husband and Son #4 ended up doing most of this job.

We kept watch on how much cement was still needed out front. Rush rush rush. Our hour was ticking away....


We were getting close to the end of the sidewalk... though we did have to go around the corner yet .... the retaining wall curves, so we made the new sidewalk go around that curve.

Cement was almost gone, but it looked like we would be okay. I talked with the cement truck driver and told him I was sure he could tell we had never done this before and that we didn't really know what we were doing,  as I laughed with relief that we were getting done within our hour AND we had enough cement.

He said we were much more prepared than most professional jobs he delivers to. He was REALLY impressed with our work. Wow!  :)  


Still rushing to pack the cement in and smooth it off before it sets up too much. This step was not as easy as it looks!


Closer to the road side of the project, we were still packing the cement in and filling low spots and getting it level with the driveway and city sidewalk.


 We were all taking turns using hand tools and working the cement. I was doing my part here... We were getting to point of wanting and needing a break, but we still needed to hurry.


The picture below shows Son #3 working the corner closest to the house.


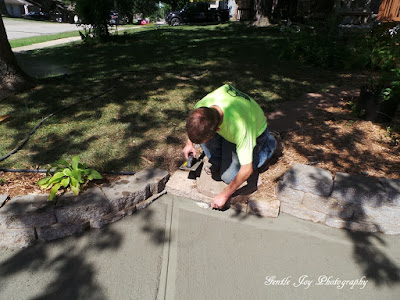
 Son #2 is doing finishing work here... smoothing the edges and making the cuts.

This son headed up this whole job...  and that gave him experience while also helping us. We have done many many home school shop projects like this. Dad pays for the materials (Usually, we have to save up money for the project before we do it, but that is part of life, too.) and the kids(and the whole family!) learn new skills. A win win.  :)  Son #2 has already graduated a few years ago, but the principle still works!


 It looks great!  We were surprised how great it was turning out...  Like a "real" sidewalk! :)

By the way, our two daughters also worked on this project... not as "hands on" as the rest of us, but their work was so valuable to the project also.

They helped with tools, cold drinks, snacks, and encouragement.


In this picture, you can see the house numbers by the front door... hard to see, but they are there. Those are shown in the post:    Make Your Own House Numbers

Wow, the sidewalk.. and the brick wall  sure added a LOT to the look our our house. We have had some visitors who do this kind of  work and they were VERY complimentary of the job.

It has been so much nice to use that sidewalk instead of stepping stones or dirt.


The rock wall was a project that Sons #2,3,4 did... they did a great job and the sidewalk made it look finished.

By the way, we bought all of those wall bricks off of Craigslist, which saved us a lot of money on the project. They are not always on there, but if you are needing some, it can be a great place to check for some at about half of the price from the store. 

We added a strip of garden around the inside of the top of the brick wall and I added hostas, dianthus and crocus, so these two projects have really added to the curb appeal of our home. We get many comments about our landscaping...  but we don't spend a lot of money on it... someday, I will do a post on tips to do that.


I was really thankful for the way this project turned out and I was even more thankful that it was a family project and we all worked so hard on it together. Son #1 doesn't live here anymore and he didn't work on this project, but he still gets involved in others, like this one that he did mostly on his own and we have sure enjoyed using these wonderful bookshelves!

Family Room Project:Adding Built-In Bookshelves


Thank you for visiting today.  There are so many projects that can add to the curb appeal of a house.. some are small and easy and others are bigger and more involved. I would love to hear, in the comments, what you have done(or plan to do) to improve your curb appeal.  I hope you have a great week.


Improving Curb Appeal-Mailbox


Shared on:


Dishing It or Digging It
Snickerdoodle Create Bake Make
Scraptastic Saturday
Friday Feature Linky
Simple Saturdays
Beautifully Creative Inspired
Saturday Sparks
Friday at the Fire Station
Blogger's Pit Stop
Vintage Charm
Paula's No Rules Weekend Party
Thursday Favorite Things
 Wise Woman
Wow Us Wednesday

Talk of the Town
Tuesdays w/ a Twist
Inspire Me Tuesday
Cooking and Crafting w/ J and J
Inspire Me Monday
Modest Mom
Art of Homemaking
Over the Moon Link Up


Featured on:

Scraptastic Saturday