Friday, February 21, 2014

What A Difference! Master Bedroom

It was time to paint the master bedroom............actually, this was one of those projects that starts out as ONE project........and turns into MANY more.....
We were removing the old popcorn ceiling from the main part of the house.......and got a little carried away....but that is for another time...........

 Back to the master bedroom............We started by removing the popcorn ceiling - that is a big messy job, especially the way we did it. We decided to scrape the ceiling when it was dry rather than spray with water and then scrape. This resulted in a lot of dust...LOTS of dust - wearing a mask was necessary. We tried to do the scraping as evenly as possible so that the ceiling would still have texture.

On this picture above, you can see the popcorn ceiling - the bumpy surface....there were also sparkles in it. We scraped all of that - thankfully, we kept the doors shut, windows open with box fans blowing out while we did it and also covered the register vents with plastic to keep the dust as contained as possible............Then we had to dust and wash the walls of all the drywall dust......and patch the walls in places.


By the way, for those of you who do not know what "popcorn" ceiling is.......it basically has little balls of syrofoam or some such substance all over it, hence the name "popcorn".  It gives a real strong textured look and was quite popular many years ago. We have lived with it and been fine with it - decided to leave it due to the work........BUT it was so worth doing!!!!

With just the scraping of the popcorn ceilings - the room looked a bit brighter - it was surprising how much darker the ceilings looked with those "popcorn" pieces causing shadows and holding dust.


The ceilings also needed to be dusted........and dusted......and vacuumed.....and dusted. It seemed like there was a LOT of drywall dust on there.


First- we painted the closets a pale soft green - and the walls are a darker blue that almost has some lavender in it.


 I wanted to do something really different......we decided to paint the woodwork white and I wanted a darker blue color.........we put color samples on the wall in different places and left them for a couple of weeks before we started any of the job - this room doesn't get sunlight so I didn't want to make it dark and gloomy, but we wanted something different.  Finally we eliminated all but the color we chose.
 In the main part of the house, we painted the ceilings that we had scraped - and we loved the soft creamy white color, which reflected the light nicely. My artistic mind started running with ideas for this bedroom though and I asked my husband if we could paint a stronger color on the ceiling. He agreed, which surprised me, but he said he has learned to trust my ideas(usually!).  :)

This is the master bedroom and we have considered selling our house, so the main idea is to keep things "neutral".  "Hmmmph", I do not want to keep them neutral, but I also don't want to chase off prospective buyers if we move, so all of this was feeling risky - especially since money was tight and we didn't want to have to paint over everything if it didn't turn out right.


We really liked the color blue for the walls, but also felt concern that it may make the room too dark, but we kept on painting all around.....and the white woodwork really worked well with the blue walls. We loved it. :)  So, now for the ceiling.........I went step by step according to inspiration which didn't come all at once.  First, we bought some light/medium blue paint and painted the diagonal walls of the ceiling. I decided to go a little darker with the top of the inset ceiling, so mixed the diagonal ceiling wall with some of the darker blue wall paint and painted that in the top.

Initially, we painted the entire diagonal ceiling "wall" with the medium color, but found that it seemed to be a bit dull, so I had the idea to paint a wrap around part from the horizontal ceiling at the bottom and it worked. It is a 9" strip all the way around and it really made the ceiling stand out.


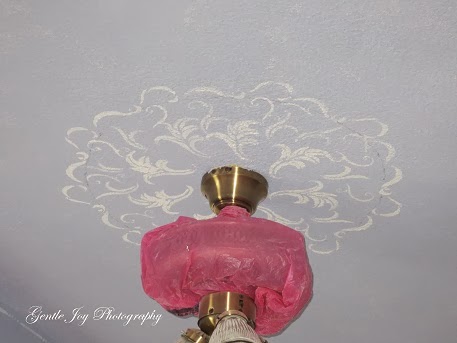
Using some stencils that I already had, I chose about 3 parts of it and did a repeating pattern in white, inside of a circle I had penciled in around the ceiling fan/light. I wanted to create a medallion look- without buying something. :)  


I used the same stencils and made a swag at each corner of the diagonal part of the ceiling.....and there is a small repeating line pattern that runs around the inside of the tray part of the ceiling. I loved it and was excited.....but was really pleased when my husband and family loved it.

Ceiling fan is put back together..........


The effect is charming - and romantic......


This is after the new carpet was installed.....


I had wanted to go for the "wow" factor in the changing of our room.........and we are so pleased with it.

I explained what we had done to our room to my builder brother and he said it was a mistake that amateurs make in painting. I didn't think so, but sent him this picture. I loved it when he agreed that it was nice and wouldn't detract from selling.


We lived without carpet in our bedrooms for several weeks, while we waited to be able to afford to buy it. It was a challenge and meant moving all of the furniture more than once, but it worked and we were really thankful for big and little area rugs.


This was a project that really turned out well - we still need to replace the old mirrored closet doors that don't work right anymore....and are saving money for that. The room is darker than it was before, but it does not, in any way, seem gloomy.........it is very inviting and appealing. I love having the smaller lamps and softer lights on.........but also the overhead light.

For cost, we bought paint for the walls, woodwork and ceiling. There were masks to use while scraping. The carpet was the most expensive part, but the carpet was probably 30 years old and NEEDED to be replaced so all of the bedrooms had new carpet put in. We also had to buy drywall mud for fixing chips or holes in the wall. All in all, this project took many man (and woman) hours, but the actual outlay of money was not very high for a completely new look.

Thank you for joining me...........after reviewing this again, I am wondering what other projects we might want to do! :)


Shared on these sites..................


On Display Thursday
Share Your Style
What's It Wednesday
Before and After Wednesday
Show and Tell Friday
The Charm Of Home
Hearts For Home
Homeacre Hop
Thriving Thursday
 http://www.momssmallvictories.com/small-victories-sunday-linky-8-bust-good-mother-myth/
No Rules Weekend Party
Blue Friday
Show and Tell Friday
All Things Thursday
Fabulously Creative Friday
Thrifty Decor Chick
Metamorphosis Monday

Tuesday, February 18, 2014

Dehydrating Foods-Part 3

This is Food Dehydrating Part 3.  If you haven't yet seen parts 1 and 2, they are available on the blog..... there area also links to them at the bottom of this post.  In those posts, I discussed dehydrators, different foods that can be dehydrated, and more.In this 3rd part, I want to try to finish up this series.....I think. :) 

Another experiment I did was to take some of the dehydrated foods and grind them up in a coffee grinder to make them very fine. I did this with the limes to make a LIME POWDER and it smelled amazing........it can be used in smoothies, make a drink mix using the powder and stevia, or add flavor to foods like cake batter. It is shown here in the little bags...........

I also made some BEEF POWDER by grinding up some of the beef jerky.........it also smelled great and can be used to flavor soups and gravies or more.

The TOMATO POWDER was great for soups and sauces.

The STRAWBERRY POWDER smelled so good! Also great for smoothies, drink mixes, granola, cake batter and more. One thing to remember about the powders is that the smaller particles of the dehydrated foods, as in the powder, will need to be used up sooner as they will lose their nutrient value and flavor more quickly than the regular dehydrated foods. They sure are handy though, and I need to experiment more with how I want to use them.......and preserve them since they are very helpful.

I also dehydrated SPAGHETTI SAUCE with the idea of rehydrating it when needed for a quick food item. It worked well. I put little blobs (about a tablespoon or so) on the plastic trays and lids. When dry, these just peel off.

Another very nice item is FRUIT LEATHER. This was a HUGE hit in my house. The nice thing about making it myself was that it had no sugar at all in it........only fruit. I made some with applesauce and some with strawberries. When using the strawberries, I blended whole strawberries, green tops and all-after they were washed, of course! The strawberry flavor was so strong and no one could tell there were strawberry tops in there. I also mixed applesauce and blended strawberries and all were greatly enjoyed. This is something we will certainly do again as it is a great travel snack.....we carried some with us when hiking and it tasted wonderful, was refreshing and was very easy to carry. After making it on the plastic trays, the fruit peels off and can be rolled in plastic wrap. This will not last forever and should be used in a reasonable amount of time unless you do some long term storage of it, which would be different than just wrapping it.......you would need to do some research to check that out. This fruit leather picture is from current time, which is after 1 1/2 years of storage - I didn't have any pictures of it when fresh. It is a bit dryer than at the beginning and the flavor is not as strong - I would definitely want to use it up quicker or wrap it better .......and maybe freeze it.

KEFIR SMOOTHIE "LEATHER" wasn't as big of a hit, but it worked okay and is something I would do again. Like I said.....I was experimenting. :)


Now, for some pictures of the dehydrated foods when they were fresh..........and again 1 1/2 years later so that you can see the difference in the looks.................


These are some of the pictures of the freshly dried items...........dried in July of 2012.


This starts the pictures of the same dehydrated foods (the ones left!!! :)..............taken Feb 18, 2014 - 1 1/2 years later.


The mixed vegetables look good and the quality is very good.


The peas are also good...


 The limes are still browned as they were at the beginning, so I wasn't too hopeful about them.....but when I opened the jar, that wonderful citrus-y smell was there, so we tried them.......eating them was not like eating a fresh lime, but the taste is tart and good. This is something we will do again.


    The oranges still look good, smell GREAT, and when I tasted it today...........taste good. :)   These are wonderful and we will definitely do this again - the only problem is that the dried oranges take up quite a bit of room in the jar, as you can see.


The broccoli also good......both kinds....


The strawberries are good and smell good and taste good.........they would be better if treated with lemon juice first, so I will do that next time, but these are definitely still good and very useful. They do not pack the "punch" they had when first dehydrated, but are still very good.


The peppers and onions have lasted well......

The shredded zucchini is okay, but has lost some color and flavor.........remember what I said earlier about the smaller pieces deteriorating more quickly. Also, these would be better if blanched first, which I did not do. 


The tomatoes still look great - the color is good.......and the smell is also great. :)  


The cheese is good - has good color, smell and taste.


The mashed potatoes have darkened a bit, but not terribly so.


The potato chunks (not pictured) have turned darker......they still smell good, but they look so dark that I do not plan to use them.....I will need to figure out how to preserve them better and halt the enzyme action better. 


   The pineapple is a success! Opening the jar smelled so good......and the taste was wonderful.


The color hasn't changed much.......


All in all, most items have lasted quite well. The reason I state it like this is that for the most part, I didn't use any special means of saving these - just dehydrated them and put them into jars and closed them up, storing them in a cool, dark place for the last 1 1/2 years. With the retention of quality with this little bit of care, imagine how good the quality would be if you added even more care to it.....like using the Oxygen absorber packets or vacuum seal them. Again, I say that dehydrating is a wonderful skill to learn.

Whether you need to preserve an abundance of food that has ripened all at once or some that has been on a great sale, this is a wonderful way to do so. You can also make healthy snacks for your family and more.

I hope you are convinced that dehydrating is a skill that doesn't need to be intimidating and I hope you will try it. Whether you can afford an expensive dehydrator or not..........you can even dehydrate in your oven or make a simple solar dryer from instructions on the internet. For me, this opens so many possibilities in food preservation, saving money and preparing good food for my family.

Thank you for visiting my blog and following this series.

~~~~~~~~~~~~~~~~~~~~~~~~~~~~~~~
Dehydrating Series:

Dehydrating Foods Part 1

Dehydrating Foods Part 2

Dehydrating Foods Part 3
~~~~~~~~~~~~~~~~~~~~~~~~~~~~~~~~

Shared on...............

From the Farm
Hearts For Home
Our Simple Homestead Blog Hop
Thriving On Thursday
Wake Up Wednesday
Making A Home
Teach Me Tuesday
Tuesday Garden Party
Tuesday Talk
Roses of Inspiration
Art of Homemaking Mondays
Mostly Homemade Monday
Good Morning Monday
Modest Mom
Wildcrafting Wednesday
Homestead Barn Hop
Weekend Potluck
The Art of Homemaking Mondays
Tuesdays With A Twist
Simple Saturday


Thursday, February 13, 2014

Dehydrating Foods-Part 2

I hope that you had a chance to read Dehydrating Foods-Part I. If you haven't yet read it, you can access it here. http://gentlejoyhomemaker.blogspot.com/2014/02/dehydrating-foods-part-1.html  You may need to copy and paste this or search on the blog for the title. I will try to make this easier, but am quite new to this.

Now, on to Part 2..........Like I said before, there are lots and lots of foods that can be dehydrated. Those foods can be used later on in soups, casseroles, breakfast cereals, trail mixes, regular meals and more. This can be a big help financially by buying produce on sale, or harvesting it in season, when you have a lot and then dehydrating it for a later time when the prices have gone back up. It can also save time as you can do quite a bit all at once, with more of an assembly line system, and then have the product to use later. There are many good reasons to dehydrate.

 PEACHES can be dehydrated and then used in snacks, oatmeal, and more. When peaches are in season, there is quite an abundance of them, so these are nice to dry. They do need to be dipped in lemon juice and water before drying and will dry soft and leathery.

LIMES were an experiment for me.....I wasn't sure how I would use them, but they were on sale and like I said, I was trying all kinds of things. I sliced them, but they can also be done by leaving them in sections and piercing the sections with a knife.

BEEF JERKY This was my first time to make beef jerky and it was a big hit with my family. My husband loved it and was so pleased with the taste that I had to limit how much they ate. :)  There are many different recipes available for jerky and different meats can be used as well. I would carefully follow the directions as you don't want any spoilage. The nice thing about doing jerky is that it is a protein source that can be saved without refrigeration. Jerky is wonderful for hiking and we have taken a small bag of jerky and another small bag of dehydrated fruit and it was quite sustaining. You do need to be sure to drink lots of fluids when you are eating dehydrated foods.

The TOMATOES, ORANGES, WATERMELON AND PINEAPPLE shown in the picture, were discussed in Dehydrating Foods - Part 1. I will say that they all worked out well and have been enjoyed.


These are the Dehydrated Soup Mixes that I made and talked about in Dehydrating Foods-Part 1. This picture just shows a bit more of the layers.......these have worked well for a quick soup to put into the crockpot in the morning and eat for supper.

COTTAGE CHEESE  Okay, I realize that this one is rather odd.....dehydrating cottage cheese?  Like I said, I was preparing to teach a class on dehydrating foods and was trying lots of unusual foods - there is a bit of the "experimenting scientist" in me. :)  Well, it worked and dehydrated well.........but I didn't check for the "official" way to do it, so I would say to use a dehydrating book and follow the directions on such foods. There are many such books available at the library or in preserving foods cookbooks or even online.


ZUCCHINI dries well and can be cut into a variety of forms for drying, depending on how you want to use it later. It does need to be blanched, as do most things. This is shredded zucchini, which can be rehydrated as it is or it could be further crumbled and added to soups or casseroles for a bit of extra nutrients.
 STRAWBERRIES were our VERY FAVORITE treat from the dehydrator. While drying the strawberries, the whole house smells amazing!!!!  They are supposed to be blanched, but we just sliced them onto the trays and dehydrated and 1 1/2 years later, the color has darkened and the flavor is not quite as intense, but they are still a favorite treat here and still smell and taste great. I have several dehydrators and when strawberries were on sale, we did a lot of them. It takes a lot of them to fill a jar and you want to use moderation in using them, but they are so good. It is easy to overeat on dehydrated fruits, so it is good to remember not to eat more dehydrated fruits than you would eat of those fruits if they were fresh.


 KIWI was another fruit that we had and sliced and dried....and enjoyed. :)

COLBY JACK CHEESE  This was one of my experiments.......and it took some adjusting....like there is a lot of oil in cheese and I had to use paper towels to soak it up while it dried.......but it was a success. While it won't rehydrate into the same texture as cheese is before drying (the absence of the oils is part of this), it retains the flavor and is great for adding to foods.

I also dehydrated CHERRIES, SPAGHETTI SAUCE, BLUEBERRIES, HERBS  and more. Some need a bit of special treatment, but not too much and they are worth doing. For example, when doing whole fruits, like blueberries, you need to pierce each one so that the moisture can evaporate from the fruit.

Most of my dehydrated foods are in recycled jars - you may have noticed pickle jars, salsa jars, jam jars, regular canning jars and more in the pictures. I use what I have. This won't work well for long term storage - meaning years and years, and it could be a problem if you are having to move your foods from location to location or live in earthquake prone areas, but for me they are working great. I was careful about the foods I put into the jars - for example, I did not put those wonderful strawberries into a pickle or salsa jar as they would pick up the leftover smells on the lid and it would make the strawberries not taste as good. For the soups; however, the pickle and salsa jars were great.

After dehydrating the foods and making sure there was no moisture left (which can spoil the whole container), I packed the jars pretty full, then put the lid on. I have been very careful not to open the lids often as each time the jar is opened, you are allowing a little moisture to enter the jar. For that reason, I think that smaller jars of dehydrated foods may be better unless you use a lot of the food up quickly. Keeping them closed up tight allows them to retain their flavor, color and freshness longer.

You can also purchase the keep-dry packets and place them in the jars. I have not done this, but it would work. You can also use a vacuum sealer to vacuum seal the jars and preserve them longer. I plan to use my dehydrated foods within 1-5 years and have not gone to the extra work but may add that at some time.


When I have lots of foods to harvest from my garden or on sale, I can keep my 5 dehydrators running for days to keep up with all of it. It is a lot of work at the time, but such a nice benefit for the rest of the year. No, you do not need 5 dehydrators.....one will do an amazing amount of food. The Lord provided these dehydrators for me at garage sales for very good prices, so I have them and use them - I like to do the big project all at once and get it done and put back away. However, I keep one dehydrator out for longer periods of time for smaller amounts of food and like doing it both ways.

That's all for Part 2..........I will be doing a part 3 that should close this series - I think. I will be discussing how the foods have lasted over the last 1 1/2 years - the quality retained or lost, etc.  Also, I will be discussing another form of dehydrated foods and their uses.....I hope you will be able to join me next time. Thank you for visiting. I hope that you have a great day.

~~~~~~~~~~~~~~~~~~~~~~~~~~
Dehydrating Foods Series:

Dehydrating Foods Part 1

Dehydrating Foods Part 2

Dehydrating Foods Part 3

~~~~~~~~~~~~~~~~~~~~~~~~~~~~~~~~~

Shared on....................
Thrifty Thursday

Our Simple Homestead Blog Hop
From the Farm
Funtastic Friday
Weekend Potluck
Wordless Wednesday-O My Heartsie Girl
Homestead Blog Hop
Hump Day Happenings
Wildcrafting Wednesday
Homemaking Party
Wake Up Wednesday
Tuesday Garden Party
Roses of Inspiration
Tuesday Talk
Mostly Homemade Monday
Art of Homemaking
Modest Mom
Weekend Potluck
Tuesday Garden Party
The Art of Homemaking Mondays
Homeacre Hop
Hope In Every Season Wholehearted Wednesday
Homestead Barn Hop
Simple Saturday
 Real Food Fridays
 Make It And Love It
Tuesdays With A Twist
Weekend Potluck
Sew Crafty

Sunday, February 9, 2014

Dehydrating Foods-Part 1

I like to dehydrate foods - they take up less storage room, the foods retain their color and nutrients, they are easy to store, and they look so pretty. :)

Dehydrating foods is not complicated and you do not need expensive equipment. If you can afford an Excalibur dehydrator, great. If you can't, you can use a cheap dehydrator and get wonderful results, so I hope you will try to dehydrate some things. I have been disturbed by the snobbishness I have seen regarding the "best" dehydrator and the way such an attitude has kept people from even trying to dehydrate because they couldn't afford the "right" stuff. That is just not true. EVERYTHING I have done, was done on a cheap dehydrator.......several different kinds of them and all were bought at garage sales. Please don't be afraid to try this wonderful skill.

This picture shows a cheap round dehydrator - nothing fancy, but it works fine. Some dehydrators have temperature settings or high and low and that is certainly helpful, but again, you can do a lot in just a regular machine. If you can afford it, I would definitely recommend getting one that has settings to lower or raise the heat used. Also, I feel that one with a fan and heat is the best....and even most of the cheap ones have those now.


There are so many things that can be dehydrated and I do several and use them. However, I did a lot more as an experiment, just to see how it would work and was quite pleased with the results, for the most part. Let me just say right now that dehydrating pickles is NOT a good thing.... that's my opinion, but I am telling you, they were AWFUL! The salt was so concentrated that none of us could stand them at all. I know, I know....why did I dehydrate pickles? Well, like I said....I was experimenting and the idea came so I tried it......it was not one of my better ideas.:)

The MIXED VEGETABLES are an easy thing to dehydrate...I have bought frozen mixed vegetables on sale. The nice thing is that a quart jar will hold between 3-4 pounds of frozen mixed vegetables, making it take much less storage space. Some vegetables need to be blanched to stop the enzyme activity that can lead to the loss of color, flavor, and texture. The frozen vegetables have already been blanched and are perfect for easy dehydrating because they are all ready - you just open the bags, pour the vegetables on the trays and dehydrate.

The SOUP MIX in the 2nd and 3rd jars is something that I was experimenting with. I added lots of the dehydrated mixed vegetables, dehydrated celery, tomatoes, potatoes and other dehydrated foods from my supply. I also added some black beans, rice and or lentils. Then some msg free chicken bullion, maybe a few spices - like a little chili powder, Italian seasoning or other herbs. My plan was to have a complete soup in a jar, that could be put into a crockpot with sufficient water and let it simmer until supper. Something easy for the kids to do or for me to use as a quick food. We have tested it and adjusted the liquid and it works!! I do not have meat in these jars and that can be added afterwards, but having beans, lentils and rice helps with the protein level and it is fine the way it is. I do like to add a can of diced tomatoes to add some of the liquid and more flavor also, but I use it with just water also. Either way works and you can tailor these to be what your family likes - maybe some dried hot peppers or other foods.

The POTATOES worked out well.............AFTER some changes in my method. The first time I made dehydrated potatoes, they looked WONDERFUL until they started drying into hard gray and black chunks. What a disappointment! That is the enzyme activity that I mentioned earlier that should have been stopped in a blanching process, but I had forgotten about it. The whole batch was ruined and had to be thrown out, but it was a learning experience. The dehydrated potatoes in the jar were some that I had cooked ..... like I would when making potato salad...........and then dehydrated and they are great.

The REFRIED BEANS were another experiment, using canned refried beans. My plan in experimenting with this was to have food that was cooked and ready to eat when rehydrated, without taking very long. Dehydrators come with a plastic tray that is intended to set on one of the regular trays, to hold more liquid type foods, like fruit leather. They also work for things like refried beans....since I needed more trays and didn't have them, I used cottage cheese or sour cream plastic lids on the trays and it worked very well. I put tablespoon size globs on the lids and plastic trays and flattened them out a bit...... they dried into little clumps of refried beans. These could be used to rehydrate back into regular refried beans for burritos or other purposes, or they could also be used to add to a soup or other meal.

The dehydrated APPLES were simply cut and then dipped in a lemon juice and water mixture, which helps to preserve the color and quality. They do discolor some, but still taste great for eating as a snack or for rehydrating. The apples can be dehydrated peeled or unpeeled, in slices, small chunks or in a variety of ways, depending on how they are to be used. Dehydrated apples are wonderful in apple pie and crisp or oatmeal or other foods. The dried apples are also good in a trail mix, homemade granola or snack foods.

The jar of TOMATOES looked so good. They do darken to a dark red over time.....Initially, that jar of tomatoes smelled so fresh and wonderful and they do have good flavor and even now, 1 1/2 years later, they still smell so good. - I used some of these broken in pieces, to put into the jars of soup shown above.

ORANGE SLICES look pretty in the jar, although they will turn darker. It is hard to dehydrate them all the way due to the little "capsule"-type segments in the orange. Slicing them thin helped to open those segments and allow them to dry.


WATERMELON chunks was another experiment for me - silly, I know as what is watermelon without.......water?????  Like I said, I was experimenting and surprisingly, these do taste good. We were surprised how good these tasted, so I counted this a success.

PINEAPPLE chunks also were wonderful........I used canned pineapple tidbits and drained it and it worked well. Again, if you use the fresh pineapple, you would need to stop the enzyme action and it can be done, but it was worth it to me to just use the canned pineapple since I would have to buy it either way. If you have access to cheap fresh pineapple, you could check on specifications for doing that. Dried pineapple tastes good and is great in trail mix or just as a snack.

PEPPERS and ONIONS dehydrated well and I used the frozen ones. One thing I learned though, is that the onions can be so thin that they are hard to get off of the trays, so I found that I needed to watch them and not let them get overdone. They smell good and are great to use and worked well in the soup mix above.

CUT BROCCOLI worked well and dries into larger sized pieces......again, I used frozen broccoli for the reasons stated above ............and I was preparing to teach a class and was experimenting with many things, so time was extra important to me. Using frozen veggies saved me some steps.....and when getting these on sale, it is actually a very economical way to dehydrate.

CHOPPED BROCCOLI is similar to the cut broccoli above, but then dry much smaller and are very easy to put into soups, macaroni and cheese, eggs and more. I find that the chopped broccoli dries faster since it is smaller and I like using it better, although the chopped broccoli can be broken up after dried also.

There is much information to share and since it seems like too much for one post, I will be making this a series of posts- it will probably have 2 or 3 posts in the series, maybe more. Next in the series, I will detail more of the dehydrated foods - many more that I have done and you can see how they look in jars or bags when dehydrated. The 3rd part of the series will probably have a comparison of the jars when they were done and then how they look  now, about 1 1/2 years later, at least on the ones that I still have, as well as comments on how they hold their flavor and smell. I am not sure exactly what will be in each post, but I hope the information will be helpful.

  Thank you for joining me and be sure to sign up with email if you would like to get these sent directly to your email or feel free to check back for the next parts of the series on Dehydrated Foods. I hope that you have a great week. :)

~~~~~~~~~~~~~~~~~~~~~~~~~~~~~~~~~~~
Dehydrating Foods Series:

Dehydrating Foods Part 1

Dehydrating Foods Part 2

Dehydrating Foods Part 3


Shared on............

Thrifty Thursday

Dishing It and Digging It
Snickerdoodle
Scraptastic Saturday
Simple Saturdays
Weekend Potluck
Blogger's Pit Stop
Traffic Jam Weekend Linky Party
Foodie Friday and Everything Else
Paula's No Rules Weekend Party
Thursday Favorite Things Blog Hop
Penny Pinching Party
Homemaking Link Up
Wednesday AIM Link Party
Homestead Blog Hop
Talk of the Town
Wow Us Wednesday
Tuesdays With a Twist
Tuesday Talk
Inspire Me Tuesday
Tuesdays At Our Home
Inspire Me Monday
Modest Mom Monday
Art of Homemaking Monday


Featured on:


186th Wildcrafting Wednesday