Showing posts with label How To..... Show all posts

Friday, March 15, 2019

Root Beer Cookies


  Root Beer Cookies?  Hmmm...  That sounds different.....

  Our family was in need of something a bit different... a little fun and since the guys all like root beer, I figured they would love these.


 They had to try some of the unfrosted ones...


The root beer frosting added the extra bit of flavor these cookies needed.


 If cookies are frosted this generously, you will run out of frosting unless you make extra!

The cookies with more frosting were the most popular.


        ~~~~~~~~~~~~~~~~~~~~~~~~~~~~~~~~~~~~~~~~~~~~~~~~~~~~~~~~~~~~~~~~~~~


 A cake-like cookie with some extra sweetness and moisture added with the frosting.

They freeze well, even frosted.


                                 Root Beer Cookies

 3 cups brown sugar
 2 cups soft butter.....................  cream together
 4 eggs
 1 cup sour milk or buttermilk
 4 tsp. root beer extract.............mix in
 7 cups flour
 2 tsp. baking soda
 2 tsp. salt..................................mix in

 Drop cookies onto ungreased cookie sheet. Bake at 350 degrees for about 8 min... check and leave in oven for another minute or two if necessary. Don't over bake.

    Root Beer Frosting
4 cups powdered sugar
2/3 cup butter, softened
3 tsp. root beer extract
4 Tbsp hot water............................... Mix until smooth


Frost cookies.... the frosting makes quite a lot, but it goes fast, so you will end up with unfrosted cookies if you frost too generously.... we did.
 

~~~~~~~~~~~~~~~~~~~~~~~~~~~~~~~~~~~~~~~~~~~~~~~

 
 Reviews on these Root Beer Frosting cookies were mixed.... most liked them, especially fresh out of the oven.... and especially with the frosting although they were also enjoyed without frosting. Some loved these cookies.

The cookies are cake-like so appealed to those who like cake more... those who like moist chewy cookies didn't care for them as much.

They do take a lot of butter... almost 1 1/2 pounds between the cookie dough and frosting.


Thank you for visiting. You may also be interested in another cookie recipe:

Buttery Chocolate Chip Cookies


Wednesday, February 13, 2019

How to Make: ICE MARBLES!


 Ice Marbles

 Fun and easy....  Just put water in balloons and freeze them. You can add food coloring if you like. In these, I put some liquid food coloring in the opening of the balloon, then attached the end to the kitchen sink faucet and filled it, tying off after.

The balloons I used were old ones and they kept breaking, but worked anyway. Since they were so old, the balloons made flatter marbles than the ones we made in another post called: 
Frozen Water Balloons!           

We put them in stainless steel bowls and trays because the balloons were very hard to carry and we didn't want them to break. We put ours outside in the cold as it was bitterly cold. These could also be made in the summer, using the freezer, for a summer activity.


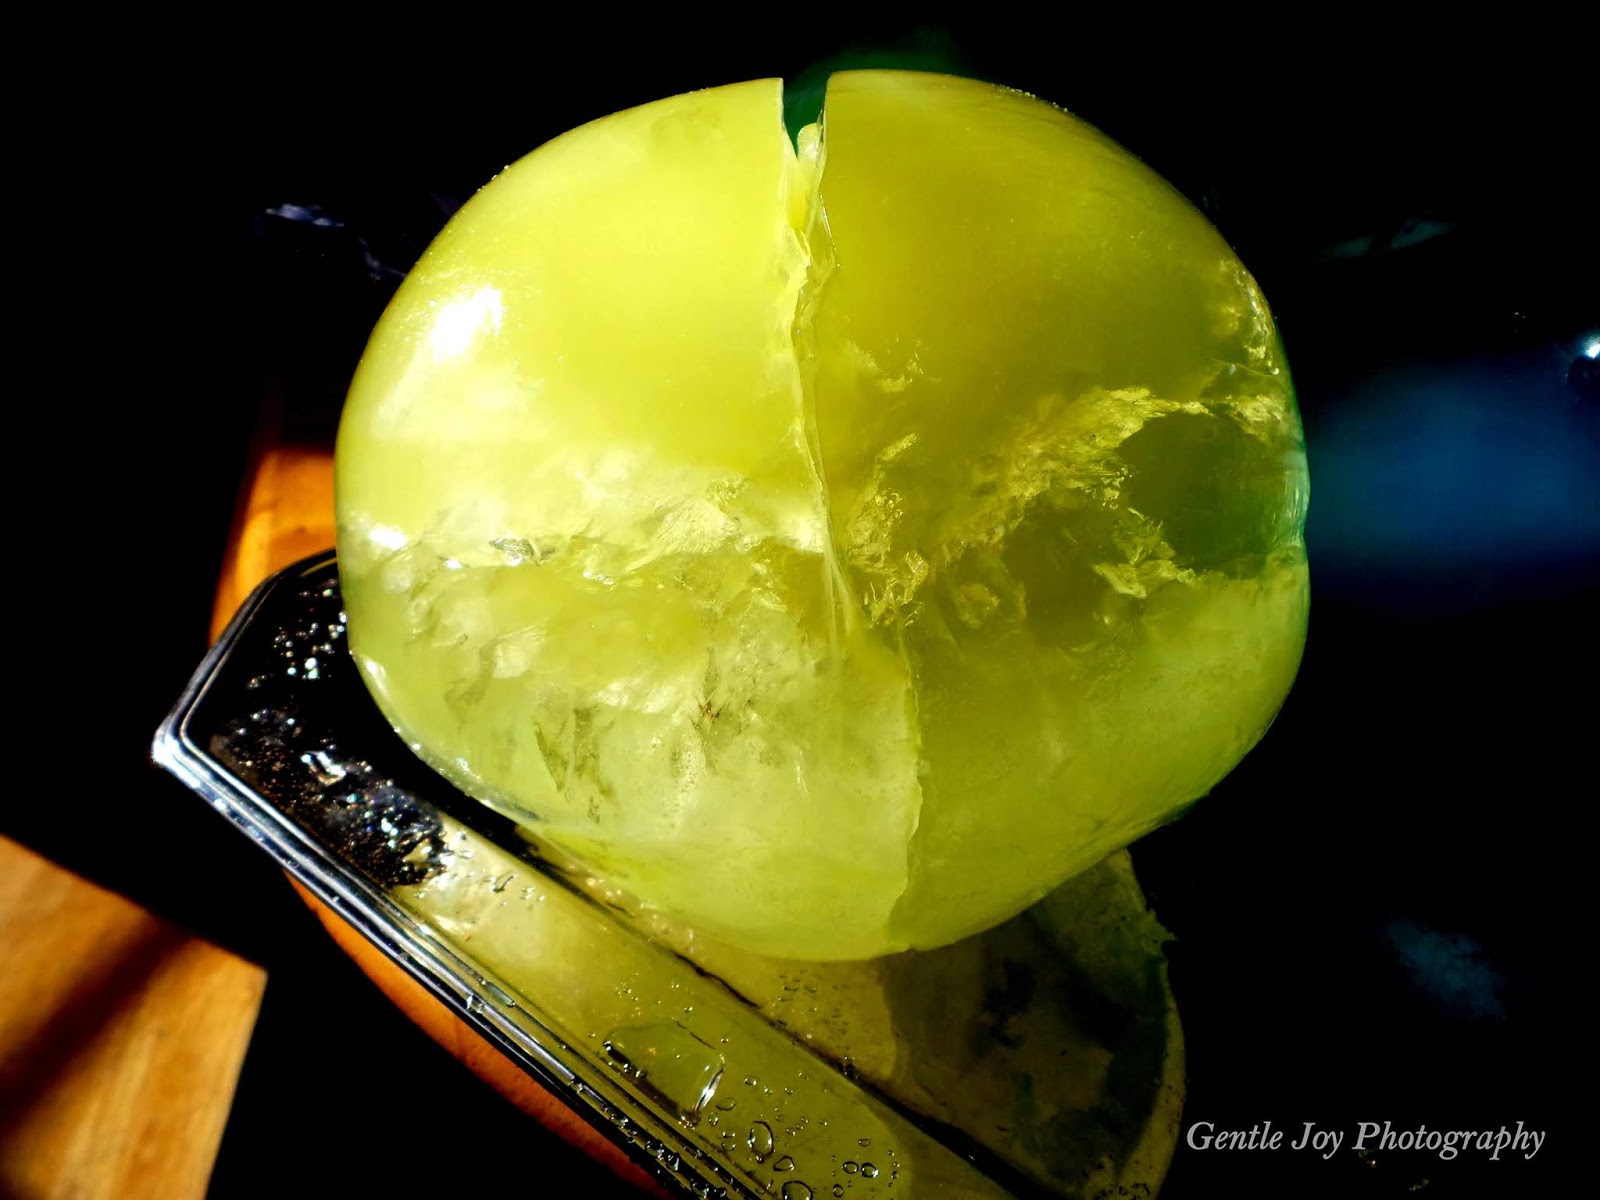
 Some balloons had and an air pocket and some showed the neck of the balloon.

Some had cracks which made them look even more like marbles.


After peeling the balloons off of the ice marbles, we took them back out to the cold to keep them from melting.


 This one cracked a lot, but stayed together and we liked the patterns.


This orange ice marble was not totally frozen inside. Though they were out for 24 hours in very deep cold, I had 3 big balloons nestled together in a large bowl and I had used warm water to get a clearer ice marble, so that is probably why it wasn't totally frozen.

This looks like an ice cave and we enjoyed seeing the crystals and patterns after the water left.


These are a good project.... fun and easy. Kids and adults both enjoy seeing them. We have put these along a walkway in the winter and they last quite a while if the weather stays cold.

Enjoy the precious times with making memories with your family... they are so important.

Thank you for visiting.


Tuesday, October 10, 2017

WHAT Is Swamp Pie???


 Swamp Pie?   WHAT?????   What is Swamp Pie?      Who would ever want to eat Swamp Pie?  Ewww! The name alone conjures up images of things no one would want in a pie. Hmmm.....

Well, swamp pie came about because years ago, I wanted to come up with a quick dessert for my family and needed to use what was in my cupboard because I had no extra money for a treat and couldn't get to the store. I don't remember the occasion... maybe just to encourage my husband, but I knew we wanted a treat for the meal.

The cupboards had food, but not much in the way of extras and money was quite tight, so I wasn't sure what I would find... we were out of so many things. I did find a couple of things that someone had given to me, that hadn't been used yet....  so decided I could make a quick and easy dessert... and I knew the kids would like it and I hoped my husband would too. My many children were quite young at the time and rather excited about the strange looking pie.

My family loved the treat and the kids kept asking what it was called. I told them it didn't have a name. That bothered them and they promptly dubbed it Swamp Pie, amid many giggles. The name stuck... and the name couldn't be changed after that, though I admit that I tried. 🙂  It became one of our funny family stories.


Those 2 ingredients? ....................... A graham cracker crust and a box of pistachio pudding mix.


We made swamp pie a few times after that first time and the kids loved it. One child even chose that for their birthday "cake" a couple of years. I haven't made it for a long time and had forgotten all about Swamp Pie until recently and decided to make it as a treat for my family.

 Our oldest son, who lives on his own, was home and we talked about Swamp Pie because I was planning to make it the next week. He was on his phone and not paying attention to the conversation, but when he heard the words, Swamp Pie, he perked up and asked "What? What is Swamp Pie?" He said it sounded familiar and he knew he should know, but couldn't remember. It was obvious that the memory was a pleasant one.... and we made sure we would have it when he could be here.


When I made Swamp Pie the first time, I just mixed the pudding as the box said and dumped it in and chilled it. It was a bit messy, which added to the appeal for the kids.

When I made it this time, I lessened the amount of milk I put in the pudding and it set up better. Either way, works fine.


This time, I made 2 pies for my family of big eaters... and they were enjoyed. We laughed about the silly name and how it seemed so intriguing and daring to them when they named the pie years ago.

What a fun memory.


~~~~~~~~~~~~~~~~~~~~~~~~~~~~~~~~~~~~~~~~~~~~~~~~~~~~~~~~~~~~~~~~~~~~~~~~


                                      SWAMP PIE!
                                             A super simple recipe and a tasty treat.


        1 ready made graham cracker pie crust

        2 boxes of Pistachio Pudding
        2-3 cups of milk............................. Whisk pudding mix and milk until thickened
                                                                 Pour into pie crust and chill.
                                                                 Serve and enjoy!


              Gentle Joy Homemaker                         gentlejoyhomemaker.blogspot.com

~~~~~~~~~~~~~~~~~~~~~~~~~~~~~~~~~~~~~~~~~~~~~~~~~~~~~~~~~~~~~~~~~~~~~~~~


That's it... it really is super simple.... and yet has a fun name. It was enjoyable to bring that memory back to our family again. A small thing, yet those small things bind us together... What a blessing. I also have to admit that Swamp Pie does sound more interesting than Pistachio Pie, although I'm sure some would argue the point! I never would have chosen such a name, but now it fits. Either way, we sure enjoyed it!

Thank you for visiting.... and I hope you will enjoy a slice of Swamp Pie... at least once.   😀


Check out this variation of Swamp Pie on this link..... .  :)  

Swamp Pie.. The updated version....


If you enjoy what you read on Gentle Joy Homemaker, you may want to check out my other blog:

Gentle Joy Photography


Sunday, August 20, 2017

How to Make CHICKEN BITS!


  I started making chicken bits and they are wonderful! I am using them the same way we would normally use bacon bits. The flavor is strong and tasty and I know what is in them since I am the one making them. Also, I have tired of the fatty bacon bits and am loving the better chicken bits. They are not hard to make either.


  First of all, I cook chicken breast... you can use other parts of the chicken, but I have used the chicken breast. I watch for it to be on sale and I love to cook it in the crockpot and let it be marinated to deepen the flavor and make it wonderfully moist.  Here's how I do that:

Strange Marinades for Chicken!

 Most of the chicken breast was shredded, as shown here, but I saved out some larger pieces to use for making chicken bits....  see next picture. I could have used the shredded chicken also, and may in the future.


  I put cooked chicken in a frying pan with olive oil and seasoning. You can use your favorites... or experiment.  :)

I used a variety of spices... including Italian seasoning, dried garlic and onion and more. I didn't measure... just sprinkled it on the cooked meat in the pan.... and added more when I wanted to.

Next step is to start cutting the meat  with the turner. Since the meat is cooked and so tender, it is easy to cut.


Cutting with the edge of the turner worked well and I kept cutting the pieces smaller and smaller.


I added some BBQ sauce and some Italian dressing to it as it was cooking... and some more olive oil. 


This was cooked on a medium heat and turned often to brown and toast the meat.


 You can decide how brown you want your chicken bits. I cooked mine for about 25 minutes or so and turned them often so they wouldn't burn.

I would have been fine with cooking them to a darker crispness and yet, we loved them this way too. I think there will be some variation on how well done you want them.

When we tasted  pieces now and then, they just tasted better and better.  What a wonderful explosion of flavor.  :)

 TIP....  Do NOT make this when you are hungry!!!  Eat something first as these smell and taste so good that it may be hard to stop "trying" them.   🙂


 I put my Chicken Bits into 2 feta cheese containers and put them in the freezer. I didn't make a lot of it...  so we will be careful on how much we use at at time... just like we would be careful about how many bacon bits we would use.

I also told the family that these containers are not to be used for casseroles or soups... these are for chicken bit uses only! They would taste great in anything, but I want to make these last.  I have some ideas of what I want to do with them... and plan to share one of them soon.


Here we had chicken bits in our broccoli salad... and they were delicious!  We usually use bacon bits, but loved the chicken bits and they added such great flavor.

We have also used chicken bits in a regular salad and on BLT sandwiches. I love having these highly flavored bits of chicken ready to add something special to dishes.


 ~~~~~~~~~~~~~~~~~~~~~~~~~~~~~~~~~~~~~~~~~~~~~~~~~~~~~~~~~~~~~~~~~~~~~~~~~

           How to make delicious bits of chicken to use in place of bacon bits.


                          Chicken Bits


 1-2  Chicken breasts, already cooked
 1/2 cup Olive Oil
 1 1/2 - 2 tsp dried Italian seasoning (can add other seasonings also, if desired)
 1/2 tsp. dried garlic
 1 tsp. dried onions ..................................... Put in frying pan, cook on medium heat. Cut meat
                                                                           into small pieces as it cooks

1/4 cup BBQ sauce
1 cup Italian dressing.................................. Stir in and continue to turn over as the meat browns


................................................................ Cook on medium heat for about 25 minutes until it reaches
                                                                    the brown and toasty color you like. This needs to be
                                                                    watched as you don't want it to burn.

                                                                 More olive oil can be added, if desired.                                                                   


                                                                  Store in a covered container in the freezer and use as
                                                                      needed. Great for salads, pizza, BLTs, and more.


Gentle Joy Homemaker                               www.http://gentlejoyhomemaker.blogspot.com

~~~~~~~~~~~~~~~~~~~~~~~~~~~~~~~~~~~~~~~~~~~~~~~~~~~~~~~~~~~~~~~~~~~~~~~~~~
               
 Thank you for visiting... If you make these, I would love to hear about it... and how you use them.... or if you have made something similar.  I love to read your comments.  I hope you have a wonderful week.


Shared on:


Scraptastic Saturday
Simple Saturday
Home Matters Linky Party
Inspiration Spotlight
Paula's No Rules Weekend Party
Thursday Favorite Things
Share Your Cup
Penny Pinching Party
Aprons and Pearls Link Up
Wise Woman
Tuesdays w/a Twist
Inspire Me Tuesday
Amaze Me Monday
Cooking and Crafting w/ j and j
Art of Homemaking Monday
Modest Mom Monday
Over the Moon Link Party


Sunday, July 30, 2017

4 Great Fruit and Herb Waters


 We are trying hard to increase our fluid intake... and are drinking a lot of plain water. Sometimes, though, it is nice to have something with a little flavor... a little different, so I have been making these Fruit and Herb Waters.

I don't know why I stopped making such drinks... it doesn't take long... and it doesn't take a lot of ingredients... and I have fresh herbs right outside in my garden!


 This one is Lemon, Basil, Sage and Mint Water and it is so refreshing, with a light flavor, but not like a lemonade. It is just a fresh water taste. I used 1 lemon sliced and a few herbs...  to make a gallon of drink... and then I also refilled it with water, so we actually made 2 gallons of drink with this small amount of ingredients. Delicious!


 This next one is Lime, Basil, Lemon Balm and Mint.

There is only one small lime sliced, and some herbs... not a lot.

It gave some flavor and this drink was refreshing also... the herbs add a little taste.. not a lot as I don't want to overpower the taste. I love that we are getting some nutrition in with our fluids, but no sugar or fake additives.


 This drink is Orange-Basil Water. Yes, I have a lot of basil.  :)  This basil isn't as strong as some of them, so if you have the strong basil, you may want to put just a little in to see how much you like.


 I thought I would show this Orange-Basil Water with what we had for supper that night... they went quite well together.

We had meatloaf burgers... and they were WONDERFUL! If you are interested, you can find the recipe here:

 Hearty Meatloaf Burgers


 This is Cucumber Strawberry Water.  I used one small cucumber and 2-3 strawberries.

We have enjoyed all of the Fruit and Herb Waters and I have more to try and will plan to share those in a future post.

I am pleased that my family is enjoying these drinks and we are getting a bit of nutrition from them. I think it is helping us to drink a bit more fluid also.

Yes, I still encourage each one to drink a LOT of plain water also, but 2 or 3 glasses of the fruit waters a day has been a nice addition to our water intake... and we can also eat the fruit that is in the drink. This has been especially helpful with the hot temperatures we have had lately.

By the way, one daughter said that her favorite of these 4 drinks was the first one... the Lemon, Sage, Basil and Mint. Just a reminder...  you don't need a lot of the herbs to add a little flavor... and bruising the leaves can help more flavor to be released into the water, although I didn't do that for most of mine.

I love how fresh and colorful the pitcher of Fruit and Herb Water is...  I hope you enjoy some of these also... or experiment and find some other combinations you enjoy. I have a few more to try. Thank you for visiting. I hope you have a great week.  :)


Shared on:
Scraptastic Saturdays
Friday at the Fire Station
Weekend Potluck
Home and Garden Thursday
Thursday Favorite Things
Penny Pinching Party
Homestead Blog Hop
Talk of the Town
Brag About It
Tuesday Talk
Tasty Tuesday
Inspire Me Tuesday
Tuesdays w/ a Twist
Tuesdays at Our Home
Amaze Me Monday
You're The Star
Cooking and Crafting w/ j and j
Art of Homemaking Monday
Modest Mom Monday
Over the Moon Link Party

Sunday, July 23, 2017

"Breakfast on the Go" Muffins


I have a big family and our family is very busy, like many families. Some leave early for work and others are at home, but even those who leave early, don't leave at the same times. One son usually leaves before anyone else is even up and sometimes another one does also, but they leave at different times.  Breakfasts have become a bit of a problem.

Cold cereal isn't ideal, by any means....  Eating together doesn't work. Sometimes I make a couple of  big egg casserole dishes to last for two days, so each person can heat some for their breakfast. That works sometimes, but what about the other times? Sometimes, they don't eat any breakfast, but my guys work really hard and get hungry often.... so what to do?

I wanted something quick and easy.... and ready for them to eat. I wanted something they would like, but that would have a lot of nutrition in it. I checked to see what we had on hand... and brainstormed for a muffin that would be filling, tasty and somewhat healthy.


 I used a basic muffin recipe and added a LOT of stuff to it. My kids were excited about muffins, but then VERY skeptical, after they heard of one of the ingredients I chose.

Okay, with a basic recipe, I added extra butter, carrots, roasted and salted sunflower seeds, pumpkin seeds, flax seed meal, ground chia seeds, raisins, cranberry sauce, sour cream, spices... and the ingredient that my kids didn't want?  Feta cheese! Sounds strange doesn't it?

Aldi had the Feta Cheese on sale for $1.49 and I had bought extra, so I decided to use it, especially since we didn't have much other cheese on hand. I wanted a sweet and salty type of muffin that would be satisfying and stick with them until lunch.


  After mixing the other ingredients all together, I diced up canned cranberry sauce and stirred that in too.

Like I've said before, I like to experiment... and it USUALLY turns out pretty well. (There have been a couple of recipes we didn't repeat!)


I filled the muffin cups about 2/3 of the way full. At first, I just put the batter in and baked them, but after a while, I had the idea to make them look a little nicer, so I added some old fashioned rolled oats and cinnamon to the top of each one and they did look better.


You can see the cranberry sauce on these muffins... 


These show the oatmeal and cinnamon, but not the cranberry sauce. It is down inside most of the muffins.


You can see all of the wonderful goodness in these muffins... the carrots, pumpkin seeds, sunflower seeds and more.  Delicious.


These are so good to eat hot.. or cold.  They can be eaten plain... or with butter.... or my favorite is with cream cheese. Yum.


 I have enjoyed them with a hot cup of tea and it was a wonderful combination!


~~~~~~~~~~~~~~~~~~~~~~~~~~~~~~~~~~~~~~~~~~~~~~~~~~~~~~~~~~~~~~~~~~~~~~~~~
Gentle Joy Homemaker Recipe
A great muffin packed with seeds, carrots, flavor with a sweet and salty flavor. Great for a quick breakfast on the go!!!


                  "Breakfast on the Go" Muffins


2  cups flour
1/4 cup sugar
1 Tablespoon baking powder
1/2 teaspoon salt  .......................................Mix together
1 egg, beaten
1 cup milk
1/4 cup + 2 Tablespoons butter, melted............................Mix all gently together

1 cup shredded carrots
1/2 cup roasted and salted sunflower seeds
1/4 cup pumpkin seeds
1/4 cup flax seed  meal (grind flax seeds in coffee maker)
1 Tablespoon chia seeds (can be whole or ground in coffee maker)
1/4 teaspoon cloves
1 teaspoon cinnamon
2 Tablespoon Feta Cheese (could also use any kind shredded cheese)
1/4 cup raisins
1/2 cup sour cream......................................................................Mix gently into batter

1/2 cup canned cranberry sauce (cut into small cubes)..................Mix gently into batter

Fill greased muffin cups about 2/3 full. Can add some Old Fashioned Oats and sprinkled cinnamon to the top of each muffin.

Bake at 425 degrees for 20 minutes. Cool on wire rack. Makes about 1 1/2 dozen muffins.
These freeze well, so making extra and freezing some makes these last longer. The pictures above show what I made, which was actually 4 batches of this recipe (6 dozen muffins!). 

Gentle Joy Homemaker                                   www.http://gentlejoyhomemaker.blogspot.com

~~~~~~~~~~~~~~~~~~~~~~~~~~~~~~~~~~~~~~~~~~~~~~~~~~~~~~~~~~~~~~~~~~~~~~~~~


 We have really enjoyed these wonderful muffins that are more of a meal than a dessert. They are filling and satisfying... and are a fast breakfast. I hope your family enjoys them as much as mine does. Thank you for visiting my blog.  I hope you have a wonderful week!


A few other Breakfast Ideas:

Seed Cereal Breakfast

Apple Pecan Cinnamon Rolls!

Cherry Muffins Are So Tasty!

Apple Butter Cinnamon Rolls-Wow!

A Quick Easy Breakfast!


Shared on:


Inspiration Spotlight
Tuesday Talk
Amaze Me Monday
Dishing It and Digging It
Snickerdoodle Create Bake Make
Scraptastic Saturdays
Simple Saturdays
Friday at the Fire Station
Weekend Potluck
Foodie Friday and Everything Else
Paula's No Rules Weekend Party
Thursday Favorite Things
Home and Garden Thursday
Share Your Cup Thursday
Homemaking Party
Friends Sharing Tea
Penny Pinching Party
Homestead Blog Hop
Talk of the Town
Tip Tuesday
Tasty Tuesday
Counting Our Blessings
Tuesdays w/ a Twist
Tuesday Cuppa Tea
Inspire Me Tuesday
Tuesdays at our Home
Make It Pretty Monday
Cooking and Crafting w/ j and j
Modest Mom Monday
Art of Homemaking Monday
Over the Moon Link Party