Showing posts with label Homeschooling. Show all posts

Wednesday, September 11, 2019

18 Years After the 9-11 Attack on America


                   18 Years After the 9-11 Attack on America
               Today is the 18th anniversary of 9/11, the biggest attack on American soil
               An attack that took the lives of many that day and also later days
               A day of tragedy firmly entrenched in the minds of Americans
               And a day that motivated a wonderful sense of patriotism in the country

                I remember the day when a call from my husband interrupted our homeschooling
                As he said to turn the tv on and watch ... it’s horrible... so we did
                And tried to understand as we watched a plane crash into the tower
                Thinking it was a video, but realizing we were watching a new attack

                The tears came suddenly as the shock of the unthinkable froze us
                Horror that such could happen in the Land of the Free and Home of the Brave
                Not sure if we should really believe it, yet we saw it ourselves in real time
                Wondering what else could happen and were we safe

               The horror continued as news came in and pictures were shown
               As the country tried to understand this second attack wondering what was next
               The newsman who said American is not under attack, this is in New York
               Provoked an indignant response in me of Yes,they ARE attacking us

              Because though we don’t live in New York and are farther away
              New York is one of us and the attacks seemed deliberate even then
              Attacking one part of the country meant that no part of the country was safe
              Little was known at the time, but it was obvious Americans WERE being attacked

              I had already planned to go to the store that day for needed groceries
              So went earlier than planned with my children, finding the highways and roads empty
              Feeling a fear of the unreal and unknown as there should have been many out
              Seeing familiar scenes all coated in the dark dread of the unknown

              Hurriedly buying groceries and heading quickly back to the familiar safety of home
              Yearning to have my husband there also, but waiting for him to call
              Holding my kids while tears streamed down my face, so thankful to have them
              Praying for those in danger and asking that many would be rescued

              A day of waiting, watching, praying and wondering what it all would mean
              It was a day that fear crept right into our house and hearts and we cried
              And still we watched desperately wanting a good outcome for more people
              As the reality of the losses became more and more evident

              Thankful someone finally echoed my thoughts and said America IS under attack
              And feeling a oneness with other Americans who felt united in grief
              So glad when my husband came home and for the crushing hug he gave me
              As we clung to each other in sorrow with tears flowing down our cheeks

             The next day was my oldest son’s birthday and usually a time for joy
             He hated that the day after was his birthday and for years it has been a hard day
             So young to be touched even in a small way by the evil that visited
             His birthday ever after so close to a day tainted with harsh memories

             The days after were equally sad as details came out of more tragedies and losses
             As hope turned to acceptance and grief to angry outrage
             Feeling a need to keep this from ever happening again, but not sure how
             Seeing flags all over as patriotism united Americans and we cared about each other

             God was an acceptable subject then as so many called out to Him for help
             Flying flags, helping, comforting and listening to others became the new norm
             Making me and so many others proud to be an American
             Knowing we were united and would move forward in that unity

             Many grieved and still do as the losses were deeply felt
             But what has happened to our country that was attacked by religious zealots
             Determined to kill any who disagree with them and furthering their agenda
             That those from that same religion now hold offices in this country they attacked

             So quickly we have forgotten what evil is so motivated to do
             As we open borders and invite in those who come to infiltrate not find sanctuary
             Many eyes are closed to the look of the future as more control taken by that religion
             Of those not contented to worship in freedom, but driven to conquer and control

             Why are we so foolish and caught up in entertaining ourselves that we do not see
             The dangers around us and the freedoms being given away and also taken
             Someday we will open our eyes in horror wondering how it could have happened
             Though we willingly live anesthetized lives uncaring that history is repeating itself

            Only God can fix the damage done because of hardened hearts and foolish minds
            Of those content to live in the moment but oblivious to the future implications
            Babies killed, tolerance for some, freedoms surrendered, addictions practiced
            Claiming many freedoms, but missing the point of what freedom really means


          May we learn to be sober, be vigilant and watchful. Do you have memories of that day? Maybe you lost someone on that day... or remember where you were when you heard. I'd love to hear about it in the comments.  Thank you for visiting. 


Sunday, June 4, 2017

Improve Curb Appeal: New Wall & Sidewalk


 We had some patio stones in this area with pea gravel around them, for several years and it was better than mud, BUT it really needed to be replaced. This was especially true in the last couple of years when the paving stones starting shifting and tipping because of tree roots. We took many of them out because they were not easy to walk on, but then we had.... mud, when it rained.

This project was a big one and had been put off for a long time, but finally we decided to get on with it and I was glad to get the project started.


 The guys dug and cut out tree roots and dug some more.


Next step was to put a layer of limestone down as a base...  I don't remember how much they did, but I think it was 3"-4" deep.


Next was the rebar. This step is important to keep the sidewalk and driveway level with each other and prevent settling.  The guys drilled holes into the existing sidewalks and the driveway and made a grid of rebar.


 Finally, we were all ready and the Cement Pouring Day had arrived!

We had gone over instructions so that everyone knew what to do. We had to do this fast since the truck would only be here for 1 hour for the price they quoted us. Any time over an hour would be $90 more each hour and we didn't want to pay that!

We had our hand tools all ready.


We had all of the long tools ready too. We didn't know what all we would need, so we tried to have everything we could think of for the job.

We had never done a big cement job like this before... and this was in the FRONT of the house too, so it HAD to be successful! Pressure.

Son #2 had done research on line for this project and we talked several times leading up to this project on what to do.


 We waited and then the truck pulled up and we all sprang into action, ready to rush.

We couldn't get to work though, since the cement truck driver had to check the cement and get it ready for our job. So, we waited some more.

We did a little more tamping of the stones... that's why the tamper is there. 

We had 3  wheelbarrows all ready for this and people assigned to "man" them.  


 Time to dump cement and rush for the next load. Son #4 on the wheelbarrow here and Son #2 working the cement.  Son #3 is at the wheelbarrow being filled and will bring the next load... and I am on the wheelbarrow next in line after him.


Moving along as we added so many wheelbarrow loads of cement. It was hot and we were rushing so fast.

We started to wonder if the 2 yards of cement we had paid for would be enough. We rushed through hoping it would be plenty.


 We were doing another project at the same time... stabilizing a brick retaining wall.  My husband and Son #4 ended up doing most of this job.

We kept watch on how much cement was still needed out front. Rush rush rush. Our hour was ticking away....


We were getting close to the end of the sidewalk... though we did have to go around the corner yet .... the retaining wall curves, so we made the new sidewalk go around that curve.

Cement was almost gone, but it looked like we would be okay. I talked with the cement truck driver and told him I was sure he could tell we had never done this before and that we didn't really know what we were doing,  as I laughed with relief that we were getting done within our hour AND we had enough cement.

He said we were much more prepared than most professional jobs he delivers to. He was REALLY impressed with our work. Wow!  :)  


Still rushing to pack the cement in and smooth it off before it sets up too much. This step was not as easy as it looks!


Closer to the road side of the project, we were still packing the cement in and filling low spots and getting it level with the driveway and city sidewalk.


 We were all taking turns using hand tools and working the cement. I was doing my part here... We were getting to point of wanting and needing a break, but we still needed to hurry.


The picture below shows Son #3 working the corner closest to the house.


 Son #2 is doing finishing work here... smoothing the edges and making the cuts.

This son headed up this whole job...  and that gave him experience while also helping us. We have done many many home school shop projects like this. Dad pays for the materials (Usually, we have to save up money for the project before we do it, but that is part of life, too.) and the kids(and the whole family!) learn new skills. A win win.  :)  Son #2 has already graduated a few years ago, but the principle still works!


 It looks great!  We were surprised how great it was turning out...  Like a "real" sidewalk! :)

By the way, our two daughters also worked on this project... not as "hands on" as the rest of us, but their work was so valuable to the project also.

They helped with tools, cold drinks, snacks, and encouragement.


In this picture, you can see the house numbers by the front door... hard to see, but they are there. Those are shown in the post:    Make Your Own House Numbers

Wow, the sidewalk.. and the brick wall  sure added a LOT to the look our our house. We have had some visitors who do this kind of  work and they were VERY complimentary of the job.

It has been so much nice to use that sidewalk instead of stepping stones or dirt.


The rock wall was a project that Sons #2,3,4 did... they did a great job and the sidewalk made it look finished.

By the way, we bought all of those wall bricks off of Craigslist, which saved us a lot of money on the project. They are not always on there, but if you are needing some, it can be a great place to check for some at about half of the price from the store. 

We added a strip of garden around the inside of the top of the brick wall and I added hostas, dianthus and crocus, so these two projects have really added to the curb appeal of our home. We get many comments about our landscaping...  but we don't spend a lot of money on it... someday, I will do a post on tips to do that.


I was really thankful for the way this project turned out and I was even more thankful that it was a family project and we all worked so hard on it together. Son #1 doesn't live here anymore and he didn't work on this project, but he still gets involved in others, like this one that he did mostly on his own and we have sure enjoyed using these wonderful bookshelves!

Family Room Project:Adding Built-In Bookshelves


Thank you for visiting today.  There are so many projects that can add to the curb appeal of a house.. some are small and easy and others are bigger and more involved. I would love to hear, in the comments, what you have done(or plan to do) to improve your curb appeal.  I hope you have a great week.


Improving Curb Appeal-Mailbox


Shared on:


Dishing It or Digging It
Snickerdoodle Create Bake Make
Scraptastic Saturday
Friday Feature Linky
Simple Saturdays
Beautifully Creative Inspired
Saturday Sparks
Friday at the Fire Station
Blogger's Pit Stop
Vintage Charm
Paula's No Rules Weekend Party
Thursday Favorite Things
 Wise Woman
Wow Us Wednesday

Talk of the Town
Tuesdays w/ a Twist
Inspire Me Tuesday
Cooking and Crafting w/ J and J
Inspire Me Monday
Modest Mom
Art of Homemaking
Over the Moon Link Up


Featured on:

Scraptastic Saturday


Friday, January 27, 2017

Crispy Drumstick Fun (Recipe included)


These are Drumstick treats....  with instructions on how to make them.


We like to take a fun food for the church dinner at least one time a year and we try to do something different each year. We have done some cute ones, like olive penguins, cauliflower sheep, melted snowman cookies,  ladybugs on crackers.. and more.

You can check those other fun foods out here....   
Fun Foods We Have Made

After I saw these on Pinterest(at least they were similar to these! :), I knew these were the treats for this year's Thanksgiving Feast dinner. They were a huge hit with the kids and adults alike.

We didn't have any directions on this, just a picture... so this is what we figured out to do:


Have long pretzel rods and mini marshmallows ready. Also have melted white chocolate ready, as well as a sheet of waxed paper on a cookie sheet.


 Directions: See picture above for illustration of each step

1. Break each pretzel rod in half ( or as many as you need. That big container of pretzel rods will be a lot more than needed!)

2. Dip one end of the pretzel rod (one-half of one) into the melted white chocolate.

3. Immediately attach 2 mini marshmallows to the melted chocolate and lay it on the waxed paper to set. When the cookie sheet is full, set it in the refrigerator for 5-10 minutes.

4. Remove the cookie sheet from fridge. Dip each pretzel rod half with the marshmallows on it, into the melted white chocolate to cover about half or a little more of the rod. Return the cookie sheet to the refrigerator for 5-10 minutes.
                   ~~~~~~~~~~~~~~~~~~~~~~~~~~~~~~~~~~~~~~~~~~~~~~~~~`
                                          Rice Krispy Treats

1/4 c. butter
1 package regular marshmallows                    Melt  on low heat, stirring until melted.
6 cups crispy rice                                             Stir in until well coated.
                     ~~~~~~~~~~~~~~~~~~~~~~~~~~~~~~~~~~~~~~~~~~~~~~~~

5. After making a batch of Rice Krispy Treats, pull the cookie sheet out of the refrigerator and using a spoon, scoop some of the warm Rice Krispy treat from the pan onto your buttered hand and form it around the pretzel stick and put it back on the waxed paper. You need to work quickly to do this and you can go back to do a bit more shaping of each drumstick, as needed.


 These can look like fried chicken and they are so fun.  We served some on a gingham covered tray, as shown.  We also wrapped some individually with plastic wrap and put them in a bowl with the "bone" side up and that was really cute also, but no picture of that, sorry.

We did better as we went along on these and you will too.  You can make them bigger than we did or smaller. The amount shown here on the gingham, took about a whole batch of the Rice Krispy Treats.


These were fun and enjoyed. One lady did say that they almost looked too real!  :)   My daughter and I made these and it was fun to work together with her... some special time together for just the two of us.

These were great for our church fellowship dinner. They would also be fun for a picnic, Super Bowl party, tailgate party, school treats, or other places. 

If you have made these, or intend to, I would love to hear about it in the comments. I would also love to hear any of your comments about these.  Thank you for visiting my blog today. I hope you are having a wonderful week.


#RiceKrispyTreats #Drumsticks #Funfoods #partyfood


Shared on:

Nifty Thrifty Sunday
Smell Good Sunday
Saturday Sparks
Wednesday AIM Link Party
Dishing It and Digging It
Traffic Jam Weekend Party
 Wise Woman Link Up
Weekend Potluck

Foodie Friday and Everything Else
Friday At The Firestation
Home and Garden Thursday
Art of Homemaking
Modest Mom
Nifty Thrifty Sunday


Wednesday, February 3, 2016

Old Fashioned Toys-Pattern Blocks


If you haven't heard of, or used, pattern blocks, I want to show you what they are and how they are used.

Pattern blocks come in a set with 6 shapes and each shape is a different color. Some sets have variations in the color which is what we have since we have many sets now, and they are all used together.


The shapes can be fitted together to form patterns. These patterns can be simple as little ones make trucks, people or other things with them, using lots of imagination, of course.


More complex designs can also be made... many times just by accident as a child (or adult!) just starts moving the pieces and experimenting. 


There are hundreds of possibilities... probably even more.

It is also possible to buy cards that have colored patterns on the cards and then the child can put the pattern blocks on the cards to reproduce the pattern.


You can also buy books with patterns that are only black and white and then child puts the correct pattern block on the page(without having the color to help them) and reproduces the pattern.


These can be done at a slower pace or as they get faster, they can be timed, to make it more fun.
                   ~~~~


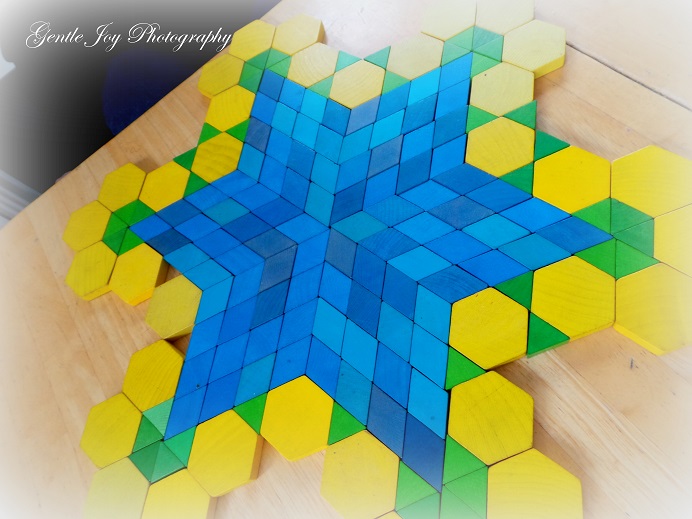
In these patterns, you can see the optical illusions that are possible... the cubes that seem to stand out.


My kids enjoyed the structured play with these blocks... using the patterns on paper, but they REALLY enjoyed the free creativity with them while they made their own patterns. 


This pattern is a continuation of the pattern above-not the one right above, but the one before... she added to the existing design above and created one that looked even different.

We have taken these pattern blocks outside for playing with the neighbor kids. The neighbor kids go to public school and always seem to wonder about our homeschool. The funny thing is that they love the simple toys like this even though they have many electronic and modern toys to use. 


We have also brought these out when we have had company and it is surprising how many people have never seen these, but enjoy using them.


Sometimes, my kids like to try some building designs.   :)

This looks like a mosaic. There are many ways to use these blocks for learning. Kids can learn about symmetry in design. They can learn to appreciate the art of their siblings. 

I have used these pattern blocks years ago, to design a simple quilt pattern. It was nice to see and play with the possibilities before I started cutting out fabric and sewing it together. No, this isn't the design I used. :)

We bought our first set of pattern blocks about 20 years ago for about $20.00. At the time, we chose to buy the foam blocks because they were quieter and we had a child with special medical issues and needed the quiet. Those were nice (although some of them ended up with teething marks from the toddlers! :)  


 We have also had plastic blocks and wooden ones. The wood ones are, by far, our favorites, so we sold the others and have added to our original set of 100 blocks or so. I have found them at garage sales and I buy them when I can. We now have a large set and can make lots of designs, even when we have several people using them at the same time.   :) 


We first bought these as they were required for our math curriculum manipulatives... the set offered for the curriculum only had a small amount of these blocks, so we decided to buy a larger set. It was hard to pay that much as money was very tight, but we have not been sorry. It was one of those great purchases. Some of you have parents and grandparents who want ideas of what to buy for your children... this is a great one... especially as a family "toy". Smaller sets would be fun, but a larger set that you can add to is even better.

 These red "arms" almost look braided. There are so many possibilities for using these blocks. I hope I have shown you enough to spark your interest in them.

By the way, I am a mom who doesn't really like battery operated toys or electronic toys much at all. I love the kinds of toys that stimulate my children to think, to experiment, to learn... as they play and have fun. That is why I am so in favor of these blocks.

Yes, as my kids get older, they do use computers and cell phones and other electronics, but I am glad we focused on the simple old fashioned toys the most.


We made all of these designs in the last few weeks as we listened to some Science lectures. What a blessing to have our hands busy and to also learn about Creation and the flood and more. It had been quite a long time since we had these out and we all enjoyed our time.

 Thank you for visiting. If you have used pattern blocks, I would love to hear about it. If you haven't, I would love to hear from you also. I hope you have a great week.  :)


Monday, June 8, 2015

Used Curriculum Sale-Buying and Selling...


We just recently went to a Used Curriculum Sale... where we bought, and sold, many items.  What a blessing... we found some great things for our upcoming school year... and we sold a lot of items we no longer need.

If you have a chance to go, it can be such a blessing to attend one of these.  :)


This is what the room looked like when we started setting up our sale table... pretty big... and very empty....   We like to get there right away on time because it takes a while to set everything up so that we are ready to sell when it is time.

 We only have 45 minutes to set everything up... before customers are allowed to begin shopping. It may sound like a lot of time, but it is needed.


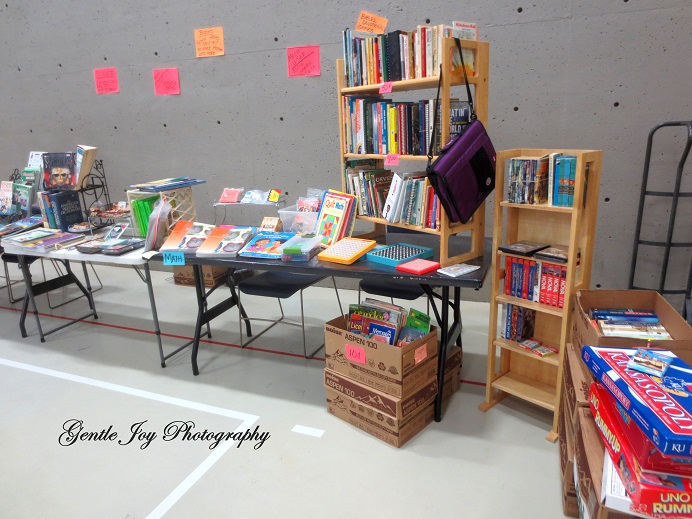
This is what the room looks like after things get going...  and actually, this wasn't the way it looked at the busiest... I was shopping at that time, so couldn't take this picture. :)  It was thinning out by this time... and you can see an empty table where someone had already closed up their selling table.


  We have been attending these events for many years... in fact, we used to have to bring a couple of blankets so our toddlers could relax under the table when they got too tired to be up.  That was a while ago.
:)

Homeschool curriculum is quite expensive... there are books and supplies to buy, so when we can find them at a reduced price, that is very helpful.  Some years, I have found LOTS of items to buy... this year, I bought some things, but not a lot.


Since we have sold things here for so many years, we have learned much that helps.  This year, they gave us 2 tables which was a huge blessing... and we also brought a folding table, so our selling area was larger than it has been before.

We have learned to bring folding bookshelves, as this really helps to display items and it makes it easier for people to shop. We also make use of empty boxes to use to stack other boxes on... as this brings things up to make it easier for people to see items without bending over so far. 

I've also learned to bring book stands for displaying books... I have collected several of the wrought iron folding ones (from garage sales. :)  and these are great for making the books more visible.

I like to price each item... AND I also like to put similar prices together... like I have a $1.00 shelf, a $2.00, $3.00, a 50c shelf (or box) and so on.  When we first arrive, we bring everything inside... then the girls and I set it all up to make it appealing. While we do that, the guys take the dollies out and help other people bring their things inside also. They enjoy helping others haul their items in... and other people tell us what a blessing they are for doing it. :)

The last couple of years, I have been making brightly colored signs to tape to the wall showing what I have... like Math u see, Usborne, Science, and more....

We bring actual school books... and we also bring other learning items... like Math manipulatives, Science experiment books and supplies, educational toys, health items.. gardening and herb books, nutrition books, novels, and lots more..... basically anything a homeschooling family may want to use.  One year, I even sold my KitchenAid mixer when I had bought a big Electrolux and didn't need the other one anymore. The lady who bought it was delighted. :)

After the girls and I have it all nicely displayed, we leave my husband and one of the kids (they trade out) to "man" the booth and sell things, while I go shopping. Someone goes with me and a couple of our kids "float" and take my purchases back to our booth so we don't have to carry them all. We have quite the system down now and it works well.

Usually, I will go back to our booth 3 or 4 times during the evening... maybe more... and will re-organize things. It is fun to notice that many things have sold, BUT I don't want it to look picked over, so I will pull out another book to put in a book holder(the book is already out for sale, but is in a box or on a shelf and I move it to a more visible spot)... you can see that one of the book holders is empty in the picture below... and I will move things around. This REALLY helps.. .and so many times, the new items I just put out, have been snatched up right away and I have to do it again.

Anyway... this is a wonderful resource to make use of and I hope you are able to attend a used curriculum sale near you. I hope you have a great week.


Shared on:


Saturday Soiree
My Flagstaff Home
Funtastic Friday
Foodie Friday and Everything Else
Paula's No Rules Weekend Party
Thriving Thursday
Our Simple Homestead Blog Hop
Thriving On Thursday
Homestead Blog Hop
Wildcrafting Wednesday
Hump Day Happenings
Wise Woman Link Up
Wake Up Wednesday
Talented Tuesday
Making A Home Homemaking Linky
Tuesday Talk
Roses of Inspiration
Mostly Homemade Monday
Good Morning Monday
Modest Monday
Art of Homemaking