Showing posts with label Gardening. Show all posts

Tuesday, April 24, 2018

Living in the Country!


We have had a dream for many years.... of living in the country. The Lord didn't allow it until just a few months ago. What a blessing to be here and to be putting in our gardens, blueberry bushes and more. In this post, I am simply sharing some of the beauty of country scenes that we enjoy.

Living in the country has been a time of discovery for us... discovering our own woodland area... it is small, but new to us. Also as spring is finally here, we are seeing what is growing wild on our land... like gooseberry bushes (we have never had those, so we will be learning), may apples (another new thing) and more. 

The purple fields are not ours, but they are so beautiful to see. 


 We have tire swings now.   :) 


 Sunsets, early mist or fog, early morning shadows, old barns, new barns, animals, birds, fields.... I love taking pictures of all of them!   :)

If you have read my blogs for any length of time, you know that I LOVE to take pictures. It is fun to have so many new scenes to see and enjoy!


 We do have a small barn - actually it is a shed built to look like a barn, but it's great for pictures as well as storage.

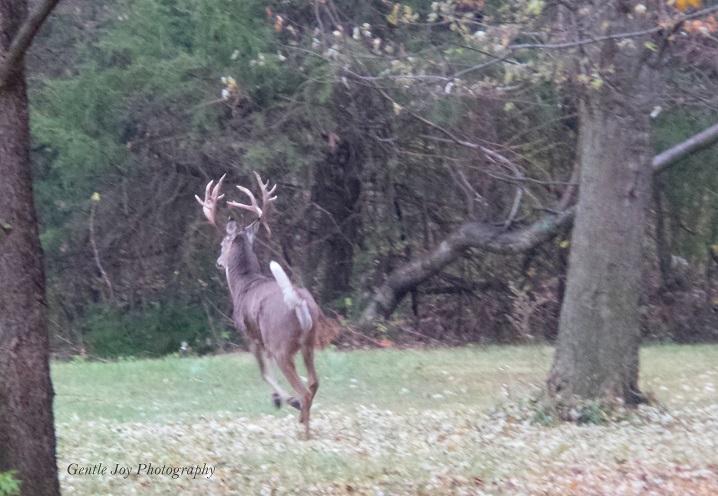


 This guy was on our property... about 30 feet from the house when we saw him. He left quickly, but I was glad to get a couple of pictures of him.


 The bird songs are amazing and we are hearing more of them now that spring is finally here.


 We have finches, mockingbirds, blue birds and more. They are beautiful.

We aren't nearly as excited about the large numbers of blue jays (19 on the front yard one morning!), black birds and starlings.  We accept the good...and the frustrating though. :)


 The farmland is beautiful (and smelly in the spring, but that is part of country living!) .


 Another photo of our large buck....


 We have 2 1/2 acres which is 10 times the land we had in the city. We are loving it.... and staying very busy!  We are already using this property a lot and look forward to what we can do with it.

 There have been many unexpected expenses since we moved .....frozen pipes and flooded driveway in the deep cold, very high electric bills for heating in this very cold winter, and more.... so we are really hoping to save some money with harvesting our own fruits and vegetables. There is a lot of work involved and we are tired, but it is exciting too.


 I liked how this photo turned out even though it isn't a usual photo. I am enjoying snapping many pictures and experimenting.


 Peach blossoms, apple tree and the beds for our blueberry bushes. This picture shows a few that are planted and my husband is trying to get 6 in the ground each evening after work. I would love to take you on a tour of our whole property... and I'm sure I will over the next few months.  :)  

We had many gardens in the city and I brought many plants to our "new" home..... sadly, we lost almost all of them as we didn't realize the garage freezes things and so I lost my starts to my herbs, flowers and more. There were no real garden beds at this house... just a decorative one in the front that had some grasses and shrubs, so we are really starting fresh. We have put in a garden plot that is rather unusual, but I think it will work for us... no pictures of that yet, but they will be coming in a future post. You know how much I blog about gardening!!!!   :) 

Anyway, it is so good to be back... thank you for joining me today and I look forward to reading your comments. Have a great week!


Sunday, June 25, 2017

Picket Fence Hides the Trash Cans...


 We live in the city, although we would love to move to the country. While we live in the city, we want our yard to look nice, and also be very usable.

We have areas that are utilitarian... not pretty. One of those areas is between our two large pine trees where we store our trash and recycling cans.


 I'd much rather look at an old picket fence than at the trash cans, so when we found an old one for free, this was a perfect place for it.

At first, my guys didn't think it was necessary, but we have all been glad to have those trash cans shielded a bit. I sure appreciated the work the guys did to make this old fence work here as they had to adjust the size of it and anchor it into the ground.


 From the deck, we can look out to the back garden with the gray picket fence and also see the picket fence in front of the trash cans.

I added hostas in front of the fence to give color and interest to the area. The pine trees drop pine needles which forms a pretty brown carpet and makes a natural mulch for the hostas.


 Here, you can see the fence between the two trees and the hostas in front of it. Other stuff that we need to deal with is behind that fence and you can see it a little. I am so glad it is behind the fence where it isn't obvious. 


We also found that this is a good place to put a thermometer since it is in the shade much of the day.

Are the trash cans totally hidden? No, they can still be seen, but the picket fence in front allows your eye to flow over them rather than to be drawn to them.


This next picture shows some of our garden areas... and at the far right you can see the trash cans with the picket fence in front of them.

At the back is the new little courtyard patio that I blogged about here:
Table Top Becomes Courtyard Patio!

The wonderful raised garden beds are in this post:
New Raised Garden Beds

The picket fence around the back garden was also an old fence we reused when someone else was done with it. There are lots of ways to use an old picket fence in the garden or yard. I love having it around my garden and shielding the trash cans, but it can also be used as an accent for a flower bed or to add interest to a boring corner of the yard.

If you have a chance to get some picket fence, it doesn't have to be in perfect shape to work well and look nice....  these have been in use in our yard for several years and they were old when we got them. They still have many years of use left in them. Sometimes a picket needs to be replaced, and we do it, but for the most part, they are fine out there with not much care at all once it is in place and I like that. I don't want to have a lot of yard items that need lots of care.

Do you have a section you want to "hide"? A picket fence could work, but something else could also... this is a time to think "outside the box" and be creative. A trellis with vines growing on it would also work....at least in the summer and fall months. What solution have you used in your yard to hide something? Feel free to share your ideas in the comments.

Thank you for visiting... 


Shared on:
Tuesdays at our Home
Snickerdoodle Create Bake Make
Scraptastic Saturday
Simple Saturdays
Saturday Sparks
 Friday at the Fire Station
Foodie Friday and Everything Else
Thursday Favorite Things
Paula's No Rules Weekend Party
Vintage Charm
Wise Woman
Homestead Blog Party
Share Your Cup
Homemaking Party
Wednesday AIM Link Party
Penny Pinching Party
Gardens Galore Party
Talk of the Town
Tuesday Talk
Tuesdays w/ a Twist
Make It Pretty Monday
Project Inspire(d)
Inspire Me Tuesday
Inspire Me Monday
Art of Homemaking Monday
Cooking and Crafting w/ j and j
Modest Mom
Over the Moon Party


Friday, January 1, 2016

Top 10 Gentle Joy Homemaker 2015


The top 10 posts published in 2015 on the Gentle Joy Homemaker blog are listed here.

Feel free to click on the title of each (it is actually a link) and the post will come up for you.


           Number 10

 Garage Sale Series-Hints and Tips


                Number 9

   Small Garden-Part 3-More Beds


                Number 8

   Pulled Chicken on Homemade Buns


        Number 7 

Small Garden-Part 4-Companion Planting 


      Number 6

Small Garden-Part 2-Growing UP 


                  Number 5 

 Small Garden-Part 1-Crop Rotation 


         Number 4

 Yes, I'm Sleep Deprived, So What??? Part 2 


                 Number 3

                Dress Up A Plain Cabinet 


          Number 2

8 Things To Do When Sickness Strikes 


Number 1 for 2015

Trip To The Amish Store 


It's been a challenging year, but it has also been a good year. Thank you for joining me in it. I hope you have a wonderful 2016.  


Shared on:
Tumbleweed Contessa


Monday, June 1, 2015

Repurposed Gutter... For Flowers?!


 I do some unusual things in my garden.... and I tend to experiment. This time I wondered about using a gutter to hook to the deck for herbs or flowers. Hmmm.... not what you usually see... in fact, I have never seen it.... but worth a try. :)


We had a piece of guttering that was closed on both ends....  I checked the decks and found that it was a perfect fit for this spot. I was actually surprised that my guys didn't make fun of me on this idea...


My Mom and Dad are visiting... this is the first visit after Dad's open heart surgery a few months ago. 
When An Emergency Strikes


With one of our sons helping,
Dad drilled holes in the bottom of the gutter, for drainage... about every 10" or so.... 

At one end, there was a large hole for a downspout... I put some plastic with a few small holes, over it before putting dirt in. Landscape fabric or screen would have been better, but I was using what was handy. :)  It works. 


 Dad is improving-it has been slow and he still has to be careful, but he wants to help also... and I am needing to find little jobs for him... ones that do not tax him too much, but that also keep him busy. I appreciate his desire to help...and the work is helping him also... we all need to be needed.

 We all agree it looks great and is a nice addition to that area.  I planted some annual flowers in it... and also some mint. The mint should smell wonderful when we have our picnics on the deck.

I would love to add another one of these to a shady part of the deck for lettuces... seems it would be great to have it so accessible to me and NOT to the rabbits! :) I will be watching for a nicely-sized piece of guttering with ends, for that project. Maybe this year, maybe next... we'll see.

  We will have to be careful to give the plants enough water as it gets pretty hot here in the summer.... and dry and they could dry out quickly. For now, with all of the rain we are having, it is doing great. :)

I hope you have a great week....


Shared on

Dishing It and Digging It
Snickerdoodle Create Bake Make
Scraptastic Saturday
Simple Saturday
Saturday Sparks
Vintage Charm
Wise Woman
Make It Pretty Monday
Project Inspire(d)
Cooking and Crafting w/ j and j
Modest Mom Monday
Art of Homemaking
Dishing It and Digging It

Featured on:

Scraptastic

Sunday, May 10, 2015

Small Garden-Part 7-Plant Labels


For several years, I have wanted to add name tags to my herbs in the garden. I wanted them so my family can learn what the herbs are and also because sometimes I get specialized herbs... and I forget what they are. :)

I have had different ideas.. and have seen things on Pinterest, but nothing looked like something I wanted to do either because of time and effort required... or the expense.


Recently, I decided to tackle this project, using an old mini blind shade. This is one we are not going to use again... and rather than throw it away, I decided to use it.

You can see at the bottom that I have cut the strings... the bottom section was cleaner. I took out 3 of the slats.


Here are the 3 slats... and I have started cutting them up. I wasn't sure how I wanted to do this, so some experimenting happened.
 I have a set of jewelry tools... I know this isn't really what they are for, but it is what I had, so I got those out.

I have been surprised how handy this set of jewelry tools has been for me... I bought them on sale for about $10.00 new... and I have been so glad to have them. :)

I also decided to use some heavier wire... this is #18 gauge galvanized utility wire.  I had bought a pound of it at a garage sale and it seemed perfect for this task.


 The one on the right is my first attempt at making this... and I think the rest are definitely improvements. :)

On the first one I did, I used the backside of the slat so that it was scooped...  that is the comfrey tag.

On the echinacea tag, I turned it so that the rounded part is what I write on... and I like it a lot better this way.


Step 1: Using scissors, cut slat piece to about 3".

Step 2: Cut the corners off

Step 3: Use hole punch to punch 2 holes at each end, as shown.

Step 4: Using a black permanent marker (A Sharpie works great), draw a simple border.

Step 5: Write the name of the plant


 Step 6: Using wire cutters, cut 18 gauge wire to about 15" length.

Step 7: Bend wire at 6" (90 degree angle)

Step 8: Make another 90 degree bend in the wire.... measure by looking at one of your slat/tags.

Step 9: Starting with long end, feed it into the tag... from the BACK of the tag. Do the same with the short end, when you get to that point.


 Step 10:  Lay tag with the backside up.... bend both wires ... once at corner, then again in middle to go down.

Step 11: Twist wire. This can be done with your fingers or pliers.


Step 12: The tag/sign will be flat... it can be used this way... or it can be adjusted (this is what I do), so that it faces upward a bit.

I like it this way so that a person who is standing in the garden can read it without having to bend down.

That's it... since the wire is quite stiff... it pushes into the garden quite well... it will bend, so push carefully.


As the patch of herbs grows, it will be easy to move the tag, if necessary. 

I have 2 kinds of thyme, so I am glad to label them both. 


I actually have 3 or 4 stands of yarrow around the yard... I'm not sure if I will label all of them or not. We'll see.

I also have basil in 2 places... this is the newest area... just transplanted a couple of days ago from another larger planting in the garden.

I hope to get some different lavenders also... I am thinking I will probably name the kind of lavender on the tag.. and maybe even the hardiness rating, so I know if I need to overwinter it in the house or not. 


 I hope to have a lot of borage this year. :)

The comfrey is new this year from a friend... I use a lot of comfrey, so I am excited to have it in my garden. :)

I don't know how long these will last... maybe only one season, maybe 2 or more, but I am so thankful to have the labels started.

Eventually, I would like to make these tags for rows of carrots, beets, radishes, peas and other veggies. It would be helpful to mark the rows until the plants come up. I would plan to take them in and re-use them the next year.


I love going to professional gardens that have their plants labeled.. that has helped me to identify some of my plants. What a treat to have my own labels now.

Thank you for visiting... I hope you found this information helpful.


     The Small Garden Series:
Small Garden-Part 1-Crop Rotation 

Small Garden-Part 2-Growing UP

Small Garden-Part 3-More Beds

Small Garden-Part 4-Companion Planting

Small Garden-Part 5-Signs

Small Garden-Part 6-Paths

Small Garden-Part 7-Plant Labels


Shared on:

Two Uses Tuesday
Funtastic Friday
From the Farm
Foodie Friday and Everything Else
Charm of Home
Green Thumb Thursday
Paula's No Rules Weekend Party
Homeacre Blog Hop
Share Your Cup Thursday
Create It Thursday
Thriving On Thursday
Wise Woman
Homestead Blog Hop
So Much At Home
Hump Day Happenings
Wordless Wednesday
Wake Up Wednesday
Talented Tuesday
Tell It To Me Tuesday
Maple Hill Hop
Tuesday Garden Party
Roses of Inspiration
Tuesday Talk
Good Morning Monday
What'd You Do This Weekend?
The Art of Homemaking