Showing posts with label Tea Time. Show all posts

Sunday, June 11, 2017

Brownies with Peanut Butter Center


 Chocolate and peanut butter just seem to go together. These brownies combine them in a wonderful way.

A chewy fudgy brownie with a peanut butter center in the middle of each one.


I mixed up my homemade brownies in one bowl and my peanut butter mixture in another.

I put about half of the brownie batter in a greased pan.... and then spooned the peanut butter mixture all over the brownie batter. 

After putting the peanut butter all over, then cover it with the rest of the brownie batter.


 Smooth it as much as possible... it doesn't need to be perfect.

Time to bake it...
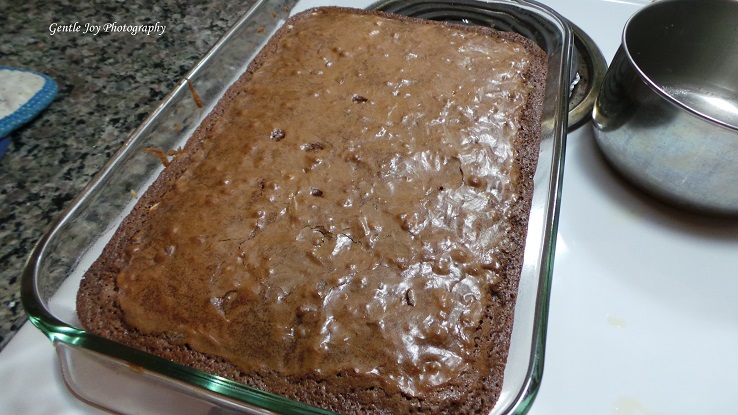


 All baked.


 Put chocolate chips all over the top of the hot brownies. Let them sit for about 5-10 minutes or just until melted.

When melted, use a table knife to spread the melted chocolate over the brownies. This will make a quick and easy "frosting" layer.


Now, they need to cool. This part takes quite a while... especially if you are impatient to taste that chocolatey-peanut butter goodness!

If you try to eat them at this point, you will need to eat them with a spoon... and you will probably burn your tongue.  Yes, there is a reason I know this.   😊


This plate of brownies was made after the brownies had cooled on the counter for an hour or so. I was sending some to work with my husband the next day and needed to get them done before bed. They were still so gooey... and not at all cooled off.

They look pathetic. It is MUCH better to let them cool.... but my husband said his co-workers loved the brownies.  :)


 TIP- One dessert my family LOVES, is hot brownies with ice cream on top. These Brownies with Peanut Butter Center would be delicious that way... and would make a wonderful dessert for company. 

When they cool... and chill... they look more like this:


 What a great snack...  brownies with peanut butter centers and herb tea. It is great out in the garden also.

The flowers in the vase are yarrow, thyme and radish tops that have gone to seed.... they are so pretty.

By the way, when an elderly friend was in my garden and saw radishes that had gone to seed, she asked WHAT those were doing in there.  I told her that they were pretty and so I was letting them stay. I liked the pretty lacy look of them in the garden and since I didn't need that area at the moment, I left them. She gave me a look that told me she had NO idea what I was talking about. She said she always takes them out of the garden before then. I guess it is the artist in me that enjoys that.... it was funny though.... and I am enjoying them in my vase also.


    ~~~~~~~~~~~~~~~~~~~~~~~~~~~~~~~~~~~~~~~~~~~~~~~~~~~~~~~~~~~~~~~~~~~~~~~

                            Brownies with Peanut Butter Center


1st Bowl....
  1 cup melted butter
  3/4 cup baking cocoa
  2 cups sugar........................................... Mix together
  4 eggs
  2 tsp vanilla............................................ Beat in
  1 cup flour
  1/2 tsp salt
  1 cup chocolate chips..............................Mix in...Put half of this mixture into a greased 9" x 13" pan.
  

2nd Bowl
  1 1/4 cup peanut butter
  1/4 cup melted butter
  1 cup powdered sugar..............................Mix together. Spoon this mixture onto brownie layer.

                                                                    Spoon the rest of the brownie batter over the peanut butter.
                                                                    Smooth it out a bit. Bake at 350 degrees for about 30
                                                                     minutes. Bake a little longer if needed.

                                                                    Take baked brownies from oven. Sprinkle 1 cup of
                                                                     chocolate chips over hot brownies. Let sit till melted. This
                                                                     should take about 5 minutes. Then spread the chocolate
                                                                     over the brownies, like frosting.

                                                                     Let cool, then cut. These are a wonderfully rich treat.  😋
                                                                   
~~~~~~~~~~~~~~~~~~~~~~~~~~~~~~~~~~~~~~~~~~~~~~~~~~~~~~~~~~~~~~~~~~~~~~~~~~


 These are not hard to make, but they taste really special.... and have been greatly enjoyed by all who tried them.

I used bittersweet chocolate chips in them this time, but semi sweet or milk chocolate would be delicious also.

This is a recipe that was an experiment, but I will definitely be making it again... my family loved it! :)  If you are short on time, you could use a store-bought brownie mix for Bowl 1.

TIP... When using a store bought brownie mix, instead of using the oil it calls for, use butter. The flavor will be much better! 

 This is a good recipe to hang onto until you need a dessert or snack that is just a bit more special... like to take to a potluck, or serve for dessert.

Thank you for visiting... I hope you have a wonderful week! 


Shared on:

Foodie Friday and Everything Else
Paula's No Rules Weekend Party
Wednesday AIM Link Party
Snickerdoodle Create Bake Make
Scraptastic Saturday
Simple Saturday
Saturday Sparks
Friday at the Fire Station
Weekend Potluck
Friday Frivolity
Thursday Favorite Things
Share Your Cup
Homemaking Party
Wise Woman
Wednesday AIM Link Party
Friends Sharing Tea
Tuesday Talk
Tasty Tuesday
Tuesdays with a Twist
Make It Pretty Monday
Project Inspire(d)
Cooking and Crafting w/ j and j
Modest Mom Monday
Art of Homemaking
Over the Moon Party

Featured on:

Thursday Favorite Things
Snickerdoodle create bake make
Saturday Sparks 

Sunday, May 28, 2017

Table Top Becomes Courtyard Patio!


Our new Patio- Courtyard... made from a salvaged patio table top.


We had a patio table top someone had gotten rid of... it was metal with tile and was beautiful, but there were no legs.


There was a broken tile on one side, which was why the people didn't want to bother with it. We figured it would still be good as a table if it had a base.

After all, it was a beautiful table top! 


 We were going to sell it, but then I had an idea. I tend to think "outside the box" especially for garden ideas... and I wondered, "What about turning this tabletop into a small patio?" I knew my guys would shoot the idea down, but I voiced it anyway.

 I was surprised when I mentioned it first to Son #2 and he thought it was a possibility.. then to my husband and he liked the idea.  They checked it over and agreed it would be strong enough since it was metal with tile on top... and they agreed it was a good idea. Wow! So we looked for a good place.

 We decided on the area outside of the back garden... it's an area I just haven't ever figured out what would be nice there. We have some surprise lilies at the back, but it's just one of those areas we don't use much at all.... SO... I asked about putting it there.

You can't see it very well, but it's the best picture I could find.

 I drank tea while I contemplated how this project should be done. I enjoy tea on the deck in the morning.


 What fun that my husband was willing to do the project... and started right away.  :)


 The digging has started!  First, my husband put the table top on the ground where we wanted it and then cut into the grass all around the edge, making a pattern.

After he lifted the table top off, he started digging out the center and put the dirt into the wheelbarrow.


 Son #4 was working on the project also and here he is putting the table top down on the dug-out area to test it. They did this a few times.. and that table top is HEAVY!

They took it back off and dug some more.


When they had enough dirt off, they added sand. (They used sandbags that were leaking from being carried in the back of a pickup all winter. Then new ones can be used next winter.)


Another test... getting closer.

By the way, the center of the table top has a hole for a patio umbrella, so my husband used a can lid and caulk to seal it to the bottom and it is working well. I plan to paint it to match the brown in the center section, but haven't yet.


Dirt was added under to finish up the leveling process.


Okay.... it's done...  now what? It looks okay, BUT now it was time to make it look nice.

It's not a large patio... only 5 feet in diameter.....  so there isn't a LOT of room, yet I wanted to add something to make it inviting... and useful.


I added a chair and table... both are plastic. I didn't want to take a chance on using metal that may be too sharp or heavy for the patio. It is a table top, after all.  :)

I also didn't want a leg to get stuck down in the spot where the hole had been for the patio umbrella.

That was better... but it needed something.


Next I put a hanging basket of flowers and some lilies. That was better, but the hanging basket of flowers was newly planted and didn't show up much. Plus, overall it didn't look right yet. More brainstorming..


 You can see the small patio out there, but it looks uninspiring... and it NEEDED something.....


We had an old gateway arbor not being used.... it's not in perfect shape, but I really liked how it tied the area together. We opened the gates and left them open so it provides a nice backdrop to our new little patio area.

I also put a hanging pot of purple petunias ( a gift from my husband!) in place of  the other hanging pot and it added that "pop" of color that really helped.

I have thought of putting a wrought iron decoration on the fence inside the arbor area, but haven't found anything yet... it will have to be something I already have or something at a very cheap price from a garage sale. I will wait and see what God provides... or will use it the way it is. Either way, I like it.  :)


 Here you can see the patio area with some long thin garden beds in front.. that "bush" is our peas! They did great this year!  :) 


 The next picture shows looking through the pea plants. 


We like our new little Patio Courtyard area. Now, the area that was a bit of an eyesore, has an appeal all its own.

I have looked out the window two different mornings, so far,  to see my husband using the new Patio Courtyard to read his Bible.  :)


I'm really enjoying our new little Patio Courtyard and I love how it looks.


There's always something to do when you own a house.. something to fix... or to fix up. It's amazing how sometimes just a small change can make a big difference. It's also nice when the supplies are free! It doesn't always happen, but when it does, it is extra special.  :)


The morning sun on the backyard gardens is so beautiful. I love this time of the year. Thank you for visiting....  I hope you are enjoying gardens and growing things also.


Shared on:

Talk of the Town
Make It Pretty Monday
Tip Tuesday
Gardens Galore
Dishing it and Digging it
Scraptastic Saturday
Simple Saturdays
Friday Frivolity
Blogger's Pit Stop
Share Your Cup Thursday
Vintage Charm
Wednesday AIM Linky Party
Homemaking Party
Friends Sharing Tea
Wise Woman
Tuesdays w/ a Twist

Inspire Me Tuesday
Project Inspire(d)
Cooking and Crafting w/ J and J
Modest Mom Monday
Art of Homemaking Monday
Over the Moon Link Party


Featured on:

Vintage Charm Party


Tuesday, December 22, 2015

Hot Cocoa Cup Cookies


Every year our family takes some fun food to our "Christmas Crunch" time at church or other times during the year.   You can see some of our other fun foods here.  
Fun Foods We Have Made

This year, I had seen cute little cups made of marshmallows on pinterest, so we experimented and made some.  They were very popular-especially with the little ones. :)


The first step is to make or buy some cookies that will work as a "saucer" for the cups.  I wanted them to be about 3" in diameter and thankfully, I had a cookie cutter that size.

I used the next smaller size cookie cutter to press a design into the edge, although I ended up covering it up with frosting. 


 I wanted to have a scalloped edge of some kind... and this worked.  Plain circles would work fine... or buy some cookies at the store of a similar size. 


Next, spread some chocolate on the top, as shown in the picture. It could be chocolate frosting.... or I used some homemade fudge that didn't set up quite right.  :)


I didn't know what to do about the little marshmallows on the top... I was figuring this out as I went....  I ended up just tearing off little pieces from a big marshmallow and it worked fine. I put 3 little marshmallows into each "cup". 

Next, I used a sharp knife to dig 2 little holes in the side of a regular sized big marshmallow-not a big hole, but enough to allow the broken candy cane handle to go into the marshmallow.


 I had to shop around to find little candy canes... a couple of places had some that were too big, or the arch was too much for these marshmallows...  Finally, we found some that would work.

Just break off the end, so there is a U-shaped piece. Push into the side of the marshmallow. Yes, it can make it a bit oddly-shaped. and the bottom wasn't flat, but it worked.

See how we used the leftover pieces of broken candy cane here....
Easy Edible Doors!


I got tired of doing these one at a time, so started a bit of an assembly line method...


 I put a layer of white frosting on each cookie-saucer, then decorated it and put some matching decoration on the cup.  I did have some decorations - the stars were from some after 4th of July sales, but I did also buy a package of 4 different candy decorations. If you have time and desire to do it, you could use only frosting also, but I was in a hurry.


 I put extra frosting on the bottom of the "cup" before I put it on the saucer... and we learned to use that frosting to make the cup as level as possible.  The bottoms of the "cups" weren't flat due to the candy cane handles.


We had so many comments on these... and the younger kids LOVED them and even used them as play food before they ate them. 


 Are these simple and easy and fast? Well.... no... but they aren't hard either... just a bit time-consuming.  We got a lot faster as we went and as we figured out how to do them.  We made 29 of them, so that took a while, but we were very glad we made them.


   These are great for Christmas or New Year's, but they would also be wonderful for a sledding party or Valentine's Day or a summer garden party.... or a little girl's tea party.  :)   There are so many possibilities with these.

We served them on stands, but they would also be great served in other ways. They can be made all the same... or varied as we did.

By they way, you don't have to be too fussy with these... as my son reminded me, "It won't take long for the kids to eat them.":)

Thank you for visiting my blog today... and I hope you and your family remember to give thanks to God for the wonderful gift of His Son, Jesus, during this season. What a blessing that Jesus came, and lived, died and rose again...defeating death and sin... so that we could have eternal life. That is the best gift ever.


Shared on:


Foodie Friday and Everything Else
Bernideen's Tea Time
Share Your Cup Thursday