Thursday, November 6, 2014

Creamy Pumpkin Potato Soup, Mmmm Good

This Creamy Pumpkin Potato Soup is a very flavorful savory soup with a hint of sweetness. The blend of flavors is unique, but pleasing. It was unlike anything we have had before, but we all really liked and enjoyed it. It is a great soup to serve with hot fresh bread or dinner rolls.. and wonderful for the cold weather. 

I have a lot of pumpkins to use and so have been thinking of fun ways to use them. We love pumpkin/potato soup, so I made that. Of course it was a bit different than I usually make it, as my kids joke that I rarely make things the same way twice. :)  I was in an experimenting mood and this really turned out to be good... very savory with a hint of sweetness. My whole family loved it and asked that I remember how I made it so that I can do it again... so I wrote it down... and here it is. :)


First, I started with butter and added diced fresh onions and garlic and sauteed it for about 10 minutes. 

Here are some of my pumpkins that I an using. Yum....   The one I used for this recipe was about 9" tall x about 10" wide... similar to the one in the middle.... and I used the entire pumpkin in this soup, but it was a big soup. I actually doubled the recipe below, so you would need a smaller pumpkin for the recipe.

We removed the seeds and strings, then peeled about half of the pumpkin and cut the pumpkin into chunks... maybe about 1" size.

The other half of the pumpkin was put on foil on a cookie sheet with a little water and baked for about 30 minutes.


 The pumpkin chunks were added to the pot and so were the potatoes, celery, carrots...
 
... and parsley after the parsley was all cut up small.  This cooked for about 30 more minutes or so until the pumpkin chunks were tender. 

I also added spices and seasonings at  this time (I added more later on also).

Here is the pot of soup so far..... next I divided it into the two crockpots (They are both about 6 quart crockpots.)

 The recipe below is for 1 - 6 quart crockpot... I doubled it to make it for my family.


Once they were in the crockpots, I added about 12 cups of water since the pot of soup so far was very thick and I was just sauteeing and cooking the vegetables. I also scooped out the baked pumpkin and added that to the soup and stirred it in.


Once in the crockpot, I added more freshly ground seasoning...  a mixture of Celtic salt, pepper, dill weed, dill seed, rosemary, dried onions, dried garlic, crushed red pepper and savory.  I make it into a mixture and grind it on top of the soup. You can see how to do that here  Grind Your Own Seasoning .... Easily... ....

You can also just add the spices instead of using the grinder. I like adding more at this point... the ones I added earlier have cooked into the vegetables... now these will simmer together and enhance the flavors.

 Then the soup simmered for about 4 hours. Oh, the house smelled so good. :)

 After the hours of simmering, I added sour cream and mixed it in. Then I spooned out about half of each crockpot and put it in the blender and blended it.  After pouring it back into the crockpot and stirring it all together, the soup became very creamy... and it smelled great.

We also made homemade dinner rolls using my Basic Homemade Bread Recipe. The hot dinner rolls were a wonderful addition to the meal.

                    ~~~~~~~~~~~~~~~~~~~~~~~~~~~~~~~~~~~~~~~~~~~~~~~~~~~~~~~~~~~~~

                               Creamy Pumpkin Potato Soup

              1/4 cup butter
              2 onions, chopped   
              3 cloves garlic, chopped
              4 cups raw pumpkin, cut into small chunks 
Note: Bake the other half of the pumpkin, cut side down, on cookie sheet with 2 Tablespoons water added. Bake for about 30 minutes. It will be used later.
              3 stalks celery, diced
              Large sprig parsley, chopped
              2 1/2 pounds potatoes, cut into pieces ..........Sautee and cook together for about 30-40 min.

              Bake the other half of the pumpkin, cut side down, on cookie sheet with 2 Tablespoons water added. Bake for about 30 minutes.
         
              1 1/2 Tablespoons chicken bullion powder
              1/2 teaspoon salt
              1/4 teaspoon black pepper
              1/4 teaspoon dried thyme
              1/4 teaspoon paprika
              1/4 teaspoon basil
              1 teaspoon tumeric
              1/4 teaspoon ground ginger
              1/2 teaspoon cinnamon
              1/4 teaspoon nutmeg
              1/4 teaspoon allspice
              1 Tablespoon bacon bits   ........................... all spices can be added while cooking on stove

          After cooking on stove for 30-40 minutes, transfer to crockpot. Then add.....
               6 cups water (or more)
               The rest of the cooked pumpkin, scraped from skin and added to soup
               Grind spices over the top generously.  Grind Your Own Seasoning.... Easily  is what I used... or you can add them separately. They are listed here:
                Celtic Salt
                Pepper
                Dill Seed
                Dill Weed
                Rosemary
                Dried Onions
                Dried Garlic
                Crushed Red Pepper
                Savory   .............I mix all of these up in my own grinder as show in the link above... or season to your own taste.

  Simmer in the crockpot for 3 - 4 hours, then add 
                 1 cup sour cream 
                 Salt and Pepper to taste

   Blend about half of the soup in a blender, then add back to the crockpot and mix together. The result is a very creamy and savory soup with a hint of sweetness.  Serve with fresh bread or dinner rolls.  Optional garnish of sliced green onions, cheese, bacon bits.


  I cooked this on the stove and then in the crockpot. It would also work to put everything into the crockpot and simmer 8 hours or so. I didn't have that much time and had to rush things a bit. This soup has a very unique flavor that my family just loved... and the fresh dinner rolls and butter went nicely with it. If you don't have all of the spices, just use what you have and see what you come up with... it should still taste great! :) 

          This makes enough to put into a 6 quart crockpot, but amounts can be adjusted if needed.
                     ~~~~~~~~~~~~~~~~~~~~~~~~~~~~~~~~~~~~~~~~~~~~~~~~~~~~


Shared on:
The Soup-er Recipe Link Up
Titus 2sDays
Hip Homeschool Hop
Monday's Musings
The Art Of Homemaking
Faith Filled Friday
Homemaking Link Up
Wise Woman
Wednesday Blog Hop
Tuesdays At Our Home
Try A New Recipe Tuesday
Treasure Box Tuesday
Mama Moments Mondays
Making Your Home Sing Monday
The Art of Homemaking
Homestead Barn Hop
Snickerdoodle Sunday
Saturday Soiree
My Week In Review
Pin Me Linky Party
Dear Creatives
Weekend Potluck
Foodie Friday
Home Sweet Home
Weekend ReTreat


Wednesday, November 5, 2014

Grind Your Own Seasoning... Easily

 
I love to use a variety of herbs and spices.... and yet, I do not like to pay high prices for them. I also love to grind them but again, I do not  like to pay high prices for them. Also, I prefer to mix my own, rather than use the pre-made mixes found in grinders in the store.

I was glad to find a wonderfully easy solution. :)  After looking at different stores and buying a couple of ginder bottles with herbs in them and using them up, I was excited to try putting my own into the bottle, BUT I found that many of the bottles with a grinder are made so that they cannot be re-used, as the lids are either "snapped on" at the factory or glued to the bottle.


 I was sad to see that, but kept looking and finally found some brands of herb/seasonings with grinders that do have a screw off top and they can be re-filled and re-used.  The main store I have bought them at is Aldi's.  I am not sure what the price is currently, but I was paying about $1.69 each... they have black pepper, poultry seasoning, herb seasoning and a couple of others.

I bought a few of them and tried them... they were okay, but my main interest was in using the bottle, so after using them up, I started to experiment.  My initial attempts were quite tame... dehydrated onions and garlic... and maybe Celtic salt. :)  That was okay, but I have branched out much since then.

I haven't bought any for a long time, as I just keep using the bottles I have. One problem with them is that the bottle itself is glass, but the lid is a hard plastic, so the lid CAN break.. yes, this is the voice of experience talking. :)  Once the lid breaks, it is time for a new grinder bottle. 

Here, you can see that I have put several herbs and spices in and they are rather layered. I fill it about 3/4 full, leaving the extra space to allow for the mixing of the herbs and spices as I shake the bottle. You could also mix them up in a separate bowl and then just fill the jar - either way will work fine.


Here is what it looks like after mixing. 
 Any dried herbs and spices that you like to cook with, can be used.  I use Celtic or mineral salt - the ones with the chunks.. they are so healthy for us and they grind nicely.  I usually use a lot of dried onions and garlic as my base... and then... add whatever sounds good.

I like to have a couple of different mixes made up and ready to use.


This mix has Celtic salt, chopped peppercorns, dill weed, dill seed, rosemary, dried onions, dried garlic, crushed red pepper, savory.

I rarely put any ground seasoning in... I use the whole rosemary and savory, so using things dried from our garden works well. I do like to add tumeric, so sometimes I put that in a mixture... and I use the powdered spice.

In some of my mixes, I will add dried peppermint or spearmint, parsley, thyme, oregano, stevia or others. Just be sure they are safe for human consumption, and then you can "play" with them.
It helps to label the mix.... I don't always do this as we tend to go through it rather quickly and I just fill it back up again... and it isn't always the same every time. :) I have been using a lot of dill weed and dill seed (though both are dill, the flavors differ a bit) ... and we enjoy the slight flavor in different foods... it adds something a bit unique, but doesn't taste like pickles!

I really like using such a mixture on hamburgers....  and the family loves it.  It works well in soup, casseroles or other foods. It works best to use it when there is a bit of time for the herbs/spices to cook into the food... we don't use these on the table to put onto already cooked food.

Anyway, this is easy.... tasty.... AND much more economical than buying prepared herb and spice mixtures. This way, it is possible to buy in bulk, but still have the convenience of a mix all ready to grind. I love how God helps to stretch our food dollars in such ways. :)

Thank you for visiting my blog today. I hope you are having a great day and week.

Shared on:


Strangers & Pilgrims-Share Your Seasoning Spice Recipes
Homemaking Link Up
Wise Woman
Tuesdays At Our Home
Try A New Recipe Tuesday
Treasure Box Tuesday
Mama Moments Mondays
Making Your Home Sing Monday
The Art of Homemaking
Homestead Barn Hop
Snickerdoodle Sunday
Saturday Soiree
My Week In Review
Pin Me Linky Party
Dear Creatives
Weekend Potluck
Foodie Friday
Home Sweet Home
Weekend ReTreat
So Much At Home
Paula's No Rules Weekend Party
Thriving Thursday
Hearts For Home
Homeacre Hop
Create It Thursday
Growing In Grace Link Up


Sunday, November 2, 2014

The Last Of The Harvest....

We had a hard freeze a couple of nights ago.... so there was a rush to get all of the rest of the harvest in.  We had already harvested the herbs.... especially the lavender, which you can read about here. We were still getting tomatoes and so those needed to be harvested, along with other things.

 I didn't harvest a lot, but I wanted to gather some more herbs to add to my supply for winter..... and there were flowers also. :)
 Here, there are a couple of mints, basil, some thyme... and roses.

We had quite a few green tomatoes and red tomatoes in the garden, so I am glad to have those. Some years, we eat the last of them close to New Year's Eve. We eat them as they ripen.

The picture also show green onions, yarrow, stevia... and more flowers. :) 


I was actually quite surprised that I had enough flowers out there to make these displays.... and wondered why I hadn't done it in the last few weeks.


The small roses started blooming again recently... I am glad to have them in the house. 


The alstoemeria was also beautiful... 


 The stevia and yarrow are hanging here.  Normally, I do not harvest herbs that are flowering.... but I did it this time and the leaves still taste sweet, so we will use them.  They will dry for a week or so, then I will put them away.

It is a bit sad to close the garden down for the winter... and yet, it is also good. There is much to take my attention in the winter months and it seems that there is an orderliness to our days and months, which is good. I do appreciate the break from gardening... although I did did up the pepper plants and potted them, hoping to have peppers this winter.... we'll see.

By spring, I will be very eager to get things growing in the garden again. For now, the garden can rest.

Thank you for visiting today. I am so thankful for all that God provides..... through the garden and in other ways.  God is the great Provider. 

Shared on:


Green Thumb Thursday
Saturday Soiree
Weekly Wrap Up
My Week In Review
Pin Me Linky Party
Dear Creatives
Home Sweet Home
Weekend ReTreat
So Much At Home
Paula's No Rules Weekend Party
Thriving Thursday
Hearts For Home
Homeacre Hop
Create It Thursday
Growing In Grace Link Up
Homestead Blog Hop
Wholehearted Home
Make Bake Create
Homemaking Party
Wednesday Prayer Girls
Teach Me Tuesday
Hip Homeschool Hop
Women Helping Women
Titus 2sday
Treasure Box Tuesday
The Scoop
Good Morning Monday
The Art of Homemaking
The Modest Mom
Much Ado About Monday
Homestead Barn Hop


Friday, October 31, 2014

Harvesting The Last of the Lavender


I have been putting it off.... schedule is too busy... but with a hard freeze coming, I was spurred to get the rest of the harvest in. I sure didn't want all of that lovely and great smelling lavender to go to waste... to freeze out in the gardens.  So, I took my huge stainless steel bowl and a pair of scissors to the garden. I live in the city, so I don't have rows and rows of my herbs, but I have them tucked here and there. For the lavender, I have a few different kinds and I harvested the rest of all of them.


There is more in this bowl than it looks like... I am so glad that I didn't lose all of this. :)

I love using herbs... there are so many ways to do so... in teas, sachets, tinctures, salves and more.

It is pleasant to have them drying and releasing some of their wonderful fragrance into the air.

I


This is one of the types of lavender... the nice thing about having different types of lavender is that they look a bit different, some flower at different times ... and the scents are also a bit unique... some are strong and robust in their scent, while others are soft and gently scented.


A different type of lavender than the picture above. Sorry that I can't tell you the name of each type... I am getting better at it, but am still dependent on labels. :) 

I kept the same kinds of lavender together and put them into bundles which I held together with rubber bands. I seem to go through a LOT of rubber bands at this time of year. :)  


After cutting all of these and bringing them into the house, the smell was wonderful. :)

You can dry these in several ways... one is to use a dehydrator, another is to bake them, at a very low temperature, in the oven. They can also be put into a paper bag... this helps to save any seeds that may fall off as they dry....... or my favorite method is to hang them in the house. I love the way the bundles look while hanging and the scent given off is pleasant and gives us the benefit of the herb even while it is drying. 


The bundles shouldn't be too large... they need to dry rather quickly and bundles that are too large can allow some mold to grow... which would ruin the whole bundle.

Our house tends to be a bit dry, but if you dry herbs in the house, you will want to be careful not to hang them where there will be steam or too much moisture.


After they are bundled, I hang them around the house.... they will be up for several days or a couple of weeks. By then, they will be fully dry and can be put into containers to preserve them. I use tins or glass jars. 


Yes, there are some over the mirror, some below a shelf on pegs, there are nails or holders in other rooms, and here they are just hooked to a shelf. There is sunlight that gets on this one, which is not ideal, but they won't be here too long.

 Sunlight can fade the color and the nutrients from dried herbs, so they should always be stored in closed containers. I love the look of glass jars pf herbs displayed openly in a room, but that damages the herbs... shortens their life, so I keep them in the dark... either in a tin, which blocks light or in glass containers which are kept inside my herb cabinet.  Yes, I had to have a cabinet devoted to storing herbs... it is not huge, but it is so helpful to have them all (well, mostly all) in one place.

Thank you for visiting today.... I hope you have had a good harvest of your herbs, if you have any. If not, they are not hard to grow and maybe another year you would enjoy trying some. I still have others to harvest. I also hope to dig up a couple of the plants that are not hardy here, meaning they won't last the winter outside. I want to bring them inside for the winter.... if I can remember which ones they are...  :)   I hope you have a wonderful week.


Shared on:

Green Thumb Thursday
Snickerdoodle Sunday
So Much At Home
Paula's No Rules Weekend Party
Thriving Thursday
Hearts For Home
Homeacre Hop
Create It Thursday
Growing In Grace Link Up
Homestead Blog Hop
Wholehearted Home
Make Bake Create
Homemaking Party
Wednesday Prayer Girls
Teach Me Tuesday
Hip Homeschool Hop
Women Helping Women
Titus 2sday
Treasure Box Tuesday
The Scoop
Good Morning Monday
The Art of Homemaking
The Modest Mom
Much Ado About Monday
Homestead Barn Hop
Weekend Brew
Weekend No Rules
Show & Tell Saturday
Saturday Soiree
Weekend Wind Down
Weekend Potluck
Anything Blue Friday
Weekly Wrap Up
Show and Tell Friday
Friendship Friday


Tuesday, October 28, 2014

My Energy Has Increased Because of Doing This....

I have been taking something new in the last few months... and it has been helping me. I have severe adrenal issues and also thyroid issues and have tried a variety of things to help, but there is certainly no magic cure.

I have tried many things that do help in a slow way and I am thankful. This has helped in a bigger way and my energy is going up little by little and I am very thankful. :) I am taking gelatin water and blackstrap molasses and I drink it together like a tea. Here it is with cheese and apples, which make a good snack.


 I have found that I need a lot of protein( it can be a help for adrenal issues)...  and I find that I do much better with a lot of protein. One source advised 24 grams of protein for breakfast... and I tried... I really did, but I cannot eat enough to make up that much protein for breakfast... it would take 4 eggs (and I am getting so that I do not like eggs after having them so often.. and there is no way I can even eat 4 eggs!) or quite a bit of beef, etc. So, though I felt a bit better... I couldn't keep it up... and I never even got up to having 24 grams of protein a day most days, let alone in the morning. However, I found that when I did extra protein for breakfast, it really did help, so I continued looking for ways to do this.

 Different brands of gelatin have varying amounts of protein.. this one has 11g of protein for each tablespoon, which is great. I am taking about a tablespoonful in the morning and a teaspoonful before bed, so even with other protein sources, I am still probably not getting 24 g every day, but that is okay.

The best way that I have found to mix it is to put a small amount of cool water in the cup and sprinkle the powdered gelatin over it.
 It starts to dissolve, but needs to also be stirred in. It will be very thick... I have used more cool water at times, so that it wasn't so thick, but then it isn't hot enough for me to drink after I add the hot water, so this amount works well for me.

My husband drinks the gelatin water just plain, but I do not like the smell of it, so I have added blackstrap molasses, which I know has many good health benefits. When I started taking this drink, I was taking it before bed and I have heard reports that blackstrap molasses can aid sleep. I suffer from insomnia which is connected with the adrenal issues, so that was a plus for me... and it did help some. These small helps were such an encouragement to me and though I did not take it regularly, I could tell that it was helping when I did.  At first, I took the gelatin as a preventative for joint issues because my husband was taking it, so I wasn't very committed to it... I didn't think I really needed it.


 Here is the thick gelatin that is all dissolved in the water.

My husband takes the gelatin for his knee.. he had a meniscus tear in his knee and was headed for surgery to "fix" it. He was in lots of pain, unable to do stairs w/o a lot of pain or the knee trying to give out on him... I drove him to and from work for weeks because his knee hurt so much when he drove, etc.

 I do things in as healthy of a way as possible and he decided to try some things, although he was very skeptical that any of it would help... we did several things for many months... gelatin water is one of those things... and he no longer limps and has actually started running again... with no surgery! This helped him to believe more in the natural ways of doing things and he has since started to take better care of his body.

 Gelatin is said to be good for joints, skin, hair and nails, digestion, a source of protein and more.... it has even been said to be of some help as an anti inflammatory.  The little packets of gelatin in the grocery store can help a little, and we used them for a while... but the gelatin found in the health food store... such as the one shown above... has helped much more and has a higher protein content. I had to pay about $19.00 for the container, I think... and it says it has 38 servings (1 tablespoon) in the container, so this is not a cheap thing, but I feel that it is really worth it to me. My energy has been so non existent for so long and I had no choice but to take long daily naps.... and severely limit activities... but now I am only taking a short nap once or twice a week... and I am doing more activities.. there has been a big improvement.


 I poured the boiling hot water into the cup with the dissolved gelatin and stirred it well... it mixes very easily at this point.

 Note:  After drinking this Gelatin/Molasses "Tea",  it is VERY important to rinse out the cup... or the bit of gelatin left in the liquid at the bottom will form a very hard layer in the bottom... especially if left overnight... yes, we have learned this the hard way. :)  It will clean out after hardened, but takes more work.


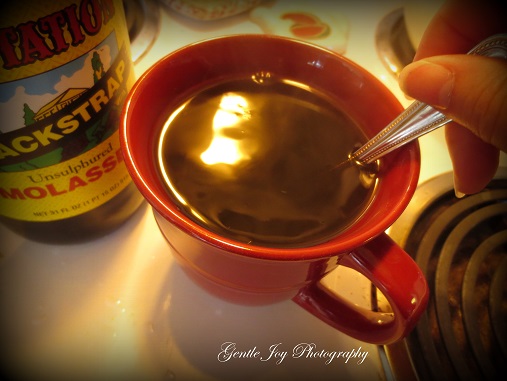
 Here is where I add the blackstrap molasses and stir it in. The amount varies. For a while, I added 2 tablespoons each time (morning and evening) so that I would get a larger amount of iron from the molasses... and it also helped my energy level ... but I became concerned about taking in that much of a sugar and didn't want to irritate or start  a candida problem, so I usually only use 1 teaspoon at a time, until I can do more research on the subject and experiment a bit. I may increase it again, but for now I am content with the progress I am seeing and do not want to unknowingly create some other kind of issue, so I am just being careful.

 Blackstrap molasses has many possible benefits - for hair, laxative effects, iron source, calcium and magnesium and other minerals and more. I have heard of people who were unable to take iron tablets because of constipation or other problems, but they did great on blackstrap molasses. If you are interested in it, you should do your own research... I am only sharing what has worked for me.. but I am not a doctor and am not advising that it will work for you. Note: Molasses and Blackstrap Molasses do not have the same benefits.. blackstrap molasses has much more good nutrition in it than regular molasses.  The blackstrap molasses that I bought.. also at the health food store... was about $7 or $8 for a 31 oz container, which should last quite a while.

 Here it is all stirred in and ready to drink. As I have been taking this combination consistently for a while, I have noticed a more stable energy level...without as many ups and downs. It is not perfect, but in my search for more energy and better health, these two things have really helped and I plan to continue them. For so long, I have found nothing that would help, so this is huge for me.  I have been able to function much better and add things to my schedule... and I have loved having some energy again, although I still have to be careful not to overdo it.  This is not the only thing I am doing for my health, but it has been a successful addition and I am so thankful to have found it. I still have down days where exhaustion hounds me all day, but I am not having as many of those at all... and I find that those days tend to be the days when I didn't have any gelatin in the morning, so it makes sense to me to continue it. I will continue my search for improved health... and for now I am so thankful for a simple and easy thing like this.

By the way, this has worked well for me... and the gelatin and other things worked well for my husband, but I am not a doctor and would never advise you to think I am saying this is some sort of "cure all".  I am just sharing what has worked well for us. It doesn't taste bad... and has become one of my "regular" teas that I drink every day or twice a day.

Sometimes there are health issues that we can face that can be quite discouraging... and it seems there is no help for them. If you are in a place like this, I hope you won't despair... God made our bodies and He knows the answers to the health issues we face and so we just keep searching and waiting on Him to show us. I feel that this is one of those areas He has allowed me to learn and I am so thankful... and I will also keep searching. Thank you for coming to my blog today and I hope that your health is good or continues to improve.


Shared on:

Over the Moon Link Party
Digging It and Dishing It
Snickerdoodle Party
Friday at the Fire Station
Home Matters Linky Party
Weekend Potluck
Blogger's Pit Stop
Friday Frivolity
Foodie Friday and Everything Else
Paula's No Rules Weekend Blog Party
Home and Garden Thursday
Share Your Cup Thursday
Wednesday AIM Link Party
Wise Woman
Homestead Blog Hop
Friends Sharing Tea
Talk of the Town
O My Heartsie Girls Wonderful Wednesday
Wordless Wednesday - Create With Joy
Tuesdays with a Twist
Tuesday Talk
Tuesdays at Our Home
Inspire Me Monday
Art of Homemaking Monday
Modest Mom
Cooking and Crafting w/ J and J