Thursday, April 30, 2015

Strawberry Layered Dessert


This dessert is delicious..... with a wonderful strawberry taste complemented by the creamy layers and chocolate.  Mmm, good... it was a hit at our house.  :)


It starts with a shortbread crust... this is in a large 11" x 17" pan, but it could also be made in a 9" x 13" pan.

Then the creamy layer is spread over the cooled crust.

Looks like a frosted cake, but it isn't done yet.....

Next step is to combine fresh strawberries with vanilla pudding mix .... then add milk and mix some more. 

Spread the strawberry mixture over the creamy layer.

Next, is some frozen whipped topping mixed with vanilla yogurt, then spread it all over also.


Top with miniature chocolate chips and sliced strawberries... then chill. 


 This dessert came about because we had company coming, but were out of ingredients for our regular company-type desserts. We had lots of fresh strawberries and this combination came to be... and it worked... it worked very well!  :)


   ~~~~~~~~~~~~~~~~~~~~~~~~~~~~~~~~~~~~~~~~~~~~~~~~~~~~~~~~~~~~~~~~~~~~~

                     Luscious Strawberry Layered Dessert
                                                                  by Gentle Joy Homemaker


Shortbread layer:
              1 cup butter, softened
              1/2 cup sugar
              2 1/2 cups flour
              1 tsp. vanilla............. Mix, pat into greased 11" x 17" pan (9" x 13" will work also)
                                                 Bake at 350 degrees for 25 minutes.  Cool.
Creamy layer:
               2 packages cream cheese, softened
               1 cup sour cream
               1 cup powdered sugar................ Whip together... spread over shortbread layer
Strawberry layer:
               2-3 cups fresh sliced strawberries
               2-small packages of Vanilla instant pudding mix..... mix together
               1 1/2 cups milk................... add to strawberry/pudding mixture and stir, will thicken slightly
                                                            spread over first creamy layer
Top Creamy layer:
               4 oz frozen whipped topping, thawed
               1 cup vanilla yogurt............................... mix together, spread over strawberry layer
 Garnish:
               3/4 cup miniature chocolate chips
               1/2 cup sliced strawberries
                               Chill and enjoy!

                                                                    
              Yes, there are several layers and this recipe may look complicated, but it isn't.... and the taste sure makes it worth making. :)  I hope you enjoy it.

                                                                                  http://gentlejoyhomemaker.blogspot.com
  ~~~~~~~~~~~~~~~~~~~~~~~~~~~~~~~~~~~~~~~~~~~~~~~~~~~~~~~~~~~~~~~~~~~~~~~~~


Shared on:


Dishing It and Digging It
Snickerdoodle Create Bake Make
Scraptastic Saturday
Friday Feature Linky Party
Simple Saturdays
Beautifully Creative Inspired
Saturday Sparks
Friday at the Fire Station
Blogger's Pit Stop
Paula's No Rules Weekend Party
Thursday Favorite Things
Homestead Blog Hop
Wise Woman
Talk of the Town
Tuesdays w/ a Twist
Inspire Me Tuesday
Modest Mom
Art of Homemaking
Weekend Potluck

Monday, April 27, 2015

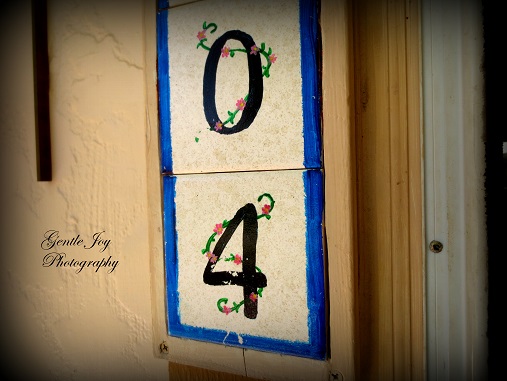
Make Your Own House Numbers


 A few years ago, I wanted to replace our worn out house numbers and make it easier for people find our house. I saw an idea that I liked.

These just use old ceramic  tiles...  like from a kitchen or bathroom... you can also buy new ones... they aren't too expensive and you only need one for each number in your address.

The ones I used are 4 1/4" x 4 1/4". They are already sealed by the factory because they are meant to use in places that get wet or need a lot of cleaning, so they are sturdy.

I liked it that this project is very inexpensive and yet it turns out to be so appealing and inviting.


I used acryllic paints.... just paint a large number on each tile and add any decoration you want that will enhance without making them difficult to see.

I also added the blue stripe around the edges... I wanted it to show up from the road and also look nice. 

After painting on them, I sprayed them with a clear lacquer meant for outside. I gave it a couple of coats. Then we made a wood frame for it, glued the tiles it and hung it outside the front door.

It has worked very well and we have been so glad to have them. You can see up close here... it isn't perfect, but they look nice

I made mine to hang vertically, but they could also be made to stay horizontal.

This idea would also work to make a sign... maybe the family name... or a statement.. sports team ...  or cottage business name.. 

These have been up for several years... I can't remember how many and am guessing maybe 5 or 6... and we have not done anything else to them. They have held up very well, although the lower ones (near the doorbell and more exposed to the sun/weather) need a little touch up, as you can see.

It is a great project... not hard, but well worth doing.

Thank you for visiting my blog today. I hope you have a wonderful week. :)


Shared on:'


Snickerdoodle Create Bake Make
Scraptastic Saturday
Simple Saturdays
Family Friday Link Party
Paula's No Rules Weekend Party
Home and Garden Thursday
The Homemaking Party
Wise Woman Link Up
Penny Pinching Party
Wow Us Wednesday
Tuesdays w/ a Twist
Tuesday Talk
Project Inspire(d)
Inspire Me Tuesday
Modest Mom Monday
Art of Homemaking Monday

Featured on:


Scraptastic Saturday       

Friday, April 24, 2015

Small Garden-Part 6-Paths


 One thing that is very important to me in the garden.... is paths. I love paths, whether they are hard surface like rocks or cement... or are soft, like pine needles. The paths can be simply functional... or beautiful... or both.
~~~~~~~~~~~~~~~~~~~~~~~~~~~
If you are interested in seeing the first 5 parts of The Small Garden Series, the links will be at the end of this post.
~~~~~~~~~~~~~~~~~~~~~~~~~~~

I love paths... and we have a lot of them.  :)

When we first moved to our house, there weren't really any at all... just a few stepping stones in the back garden.  We changed that. :)


 Paths can be beautiful and I love that part, but they can also be so useful.... and that is wonderful for us.  I do not like to walk on mud...  and paths help that.


Paths also help when there are high traffic areas of the yard because those high traffic areas will eventually wear the grass down... if there is high traffic... it will become a path of sorts. I like to make some sort of path that will hold up under the traffic.


Stepping stones like this are helpful to allow a person to step into the garden bed without compressing the soil.  I like to put a few stones here and there when there are areas I wouldn't be able to reach otherwise.


A path could be cement... a sidewalk or driveway.

 It could be flat stones that are set level with the ground. My guys have set these into the soil... it seems that all of my guys have gotten practice at setting such stones. :)

The path could be made of landscaping stones you buy. It depends on the look you want, the availability of materials and the amount of money you have to use. 

This path has crushed limestone... but it is all covered with pine needles.

 Pine needles also make a good surface for a path... and they are nice to walk over as they give cushion and there is a quietness on such a path. 

This path has some crushed rock... and lots of weeds...  it has been in place for many years and we didn't put a deep layer of rock...  and we let this get away from us... it still works fine, but it does need to be weeded. It's on the list. :)

This is a stepping stone path... made from the leftover cement from the making of the flagstone path in other pictures on this post.  We pressed leaves into them to make a pattern.

These are flat landscaping stones set into the ground. We don't want to have the mower hit them, so they do need to be set low enough.


More flat rocks... this path has a little path going off from it to go to the water faucet/hose. 

More round stepping stones...and others through the garden. 

 The walkways around the raised garden beds are helpful... on one side, the pine needles are covering most of them.

I wanted to be able to walk to my gardens... and even totally around the house... on paths with no mud. Our gardens are spread out all over our property, so this is important to me. It also helped when the kids were small, so that they could go out to use up some energy, even when it was wet... and not get muddy (usually- although sometimes that mud just beckons boys! :) 


On the other side, we have more weeds to deal with, but the more urgent thing on our list is to get the garden beds planted.

The crushed limestone has worked well and has been in for many years and the weeds have only become quite a problem in the last year or two...  I still love our walkways... they help so much. 

The flagstone paths are probably my favorite. :) You can see how we made them here:

Making A Flagstone Path

There are so many possibilities for making pathways... we have gotten many of our flat rocks for free... scavenged... or from craigslist. We have also gotten landscape rocks from garage sales or Craigslist. Rarely, we have bought them new, but that is an option, if you choose.


These stepping stones beside the yarrow, lead through this little garden.


Another stepping stone... just to give me a place to put my foot to take a step into the garden and not step on the ground... compressing the soil makes it harder for the plants to grow.

Paths are a great addition to a garden, whether large or small.
~~~~~~~~~~~~~~~~~~~~~~~~~~~~~~~~~
       The Small Garden Series

Small Garden-Part 1-Crop Rotation

Small Garden-Part 2-Growing UP

Small Garden-Part 3-More Beds

Small Garden-Part 4-Companion Planting

Small Garden-Part 5-Signs

Small Garden-Part 6-Paths
~~~~~~~~~~~~~~~~~~~~~~~~~~~~~~~~~

Shared on:
Gardens Galore
Dishing it and Digging it
Snickerdoodle-Create-Bake-Make
Saturday Sparks
 Scraptastic Saturday
Simple Saturday
Blogger's Pit Stop
Foodie Friday and Everything Else
Home and Garden Thursday
Homestead Blog Hop
Wednesday AIM Link Party
Inspire Me Tuesday
Tuesdays with a Twist
Tuesdays At Our Home
Modest Mom
Art of Homemaking Monday
Over the Moon

Monday, April 20, 2015

Spaghetti Pie


We like spaghetti and I like this variation of it.... I like to use casseroles which save time, so this is spaghetti in casserole and we call it  Spaghetti Pie. The nice thing is that it can be made ahead and then it just bakes for a bit.


To start out, just cook spaghetti noodles like you normally would cook them. When done, drain and put the noodles into a greased baking dish... I use 9" x 13" and other sizes.  I cooked 32 oz of spaghetti noodles and it fit into these two pans.

Next pour spaghetti sauce over the top.....

Smooth it to the edges. I used 4 cans of pasta sauce for these two pans.

Next, add cheese...  I used 16 oz of shredded mozzarella cheese over the two pans.  Sometimes I use other cheeses.. we really like Italian or other white cheeses for this step also.

Top with cooked hamburger. I cook hamburger ahead and freeze it. I blogged about that here:

Save Time and Money On Meals


I like to add frozen onions and peppers.

Almost done.... sometimes I stop with it just like this... and sometimes I add a bit more cheese to the top. This time I added some cheddar to the top... not much. 

 I baked it at 350 degrees for about 35-45 minutes and it was covered with foil for the first half of the time.

Sometimes I make extra pans of Spaghetti Pie while I am doing it and the extras will get covered with plastic wrap if they are to be put into the refrigerator.... or they get covered with plastic wrap and also foil if they will be put into the freezer. I love having this ready to go.  This time, though, I only made enough for supper.


One rule I  implemented in my family, years ago, about Spaghetti Pie, is that we cut into the spaghetti pie and take the spaghetti and topping together. You see, the topping is the special part and everybody loves it, so they can't take extra topping and leave the spaghetti. :)  


We had salad and cheese bread with the spaghetti pie... and cheesecake for dessert. :)


It isn't hard to make... it tastes great and it can even be made ahead of time.

Thank you for visiting my blog today. :)


Shared on:


Scraptastic Saturdays
Simple Saturdays
Blogger's Pit Stop
Weekend Potluck
Wednesday AIM Link Party
Homemaking Party
Wise Woman
Tuesdays w/ a Twist
Inspire Me Tuesday
Project Inspire(d)
Cooking and Crafting w/ J and J
Modest Mom Monday
Art of Homemaking Monday

Featured on:

Weekend Potluck